고정 헤더 영역

상세 컨텐츠
본문
| 본 글은 CloudNet@ 팀 가시다님의 'AWS EKS Hands-on' 스터디를 내용을 기반으로 정리하였습니다. Kubernetes(이하 k8s)에 대한 지식(아키텍처, 사용법 등)이 있다고 가정하고 작성했습니다. 잘못된 정보가 있으면 언제든지 알려주시기 바랍니다. |
목차
| 0. 실습 환경 배포 1. AWS VPC CNI 소개 2. 노드에서 기본 네트워크 정보 확인 3. 노드 간 파드 통신 4. 파드에서 외부 통신 5. 노드에 파드 생성 갯수 제한 6. Service & AWS LoadBalancer Controller 7. Ingress 8. ExternalDNS 9. CoreDNS 10. Topology Aware Routing 11. Amazon EKS now supports Amazon Application Recovery Controller 12. Using AWS Load Balancer Controller for blue/green deployment, canary deployment and A/B testing 13. 파드 간 속도 측정 14. AWS EKS IPVS mode |
0. 실습 환경 배포
 |
- VPC (2개)
. EKS 배포용 (myeks-vpc)
. 운영 서버용 (operator-vpc)
- Subnet 8개 - AWS Load Balancer Controller의 동작을 위한 tag 설정 추가
. EKS 배포 VPC - 6개 (Public Subnet 3개, Private Subnet 3개)
. 운영 서버 VPC - 2개 (Public Subnet 1개, Private Subnet 1개)
- VPC Peering
. 내부 통신용
0-1) AWS Cloud Formation을 통해 기본 실습 환경 배포 (Windows WSL2)
# yaml 파일 다운로드
curl -O https://s3.ap-northeast-2.amazonaws.com/cloudformation.cloudneta.net/K8S/myeks-2week.yaml

# 배포
# aws cloudformation deploy --template-file myeks-1week.yaml --stack-name mykops --parameter-overrides KeyName=<My SSH Keyname> SgIngressSshCidr=<My Home Public IP Address>/32 --region <리전>
예시) aws cloudformation deploy --template-file ~/Downloads/myeks-2week.yaml \
     --stack-name myeks --parameter-overrides KeyName=kp-gasida SgIngressSshCidr=$(curl -s ipinfo.io/ip)/32 --region ap-northeast-2

# CloudFormation 스택 배포 완료 후 운영서버 EC2 IP 출력
aws cloudformation describe-stacks --stack-name myeks --query 'Stacks[*].Outputs[*].OutputValue' --output text
예시) 3.35.137.31

# 운영서버 EC2 에 SSH 접속
예시) ssh ec2-user@3.35.137.31
ssh -i <ssh 키파일> ec2-user@$(aws cloudformation describe-stacks --stack-name myeks --query 'Stacks[*].Outputs[0].OutputValue' --output text)
yaml 파일
더보기
AWSTemplateFormatVersion: '2010-09-09'
Parameters:
KeyName:
Description: Name of an existing EC2 KeyPair to enable SSH access to the instances. Linked to AWS Parameter
Type: AWS::EC2::KeyPair::KeyName
ConstraintDescription: must be the name of an existing EC2 KeyPair.
SgIngressSshCidr:
Description: The IP address range that can be used to communicate to the EC2 instances
Type: String
MinLength: '9'
MaxLength: '18'
Default: 0.0.0.0/0
AllowedPattern: (\d{1,3})\.(\d{1,3})\.(\d{1,3})\.(\d{1,3})/(\d{1,2})
ConstraintDescription: must be a valid IP CIDR range of the form x.x.x.x/x.
MyInstanceType:
Description: Enter t2.micro, t2.small, t2.medium, t3.micro, t3.small, t3.medium. Default is t2.micro.
Type: String
Default: t2.small
AllowedValues:
- t2.micro
- t2.small
- t2.medium
- t3.micro
- t3.small
- t3.medium
LatestAmiId:
Description: (DO NOT CHANGE)
Type: 'AWS::SSM::Parameter::Value<AWS::EC2::Image::Id>'
Default: '/aws/service/ami-amazon-linux-latest/amzn2-ami-hvm-x86_64-gp2'
AllowedValues:
- /aws/service/ami-amazon-linux-latest/amzn2-ami-hvm-x86_64-gp2
ClusterBaseName:
Type: String
Default: myeks
AllowedPattern: "[a-zA-Z][-a-zA-Z0-9]*"
Description: must be a valid Allowed Pattern '[a-zA-Z][-a-zA-Z0-9]*'
ConstraintDescription: ClusterBaseName - must be a valid Allowed Pattern
OperatorBaseName:
Type: String
Default: operator
AllowedPattern: "[a-zA-Z][-a-zA-Z0-9]*"
Description: must be a valid Allowed Pattern '[a-zA-Z][-a-zA-Z0-9]*'
ConstraintDescription: operator - must be a valid Allowed Pattern
TargetRegion:
Type: String
Default: ap-northeast-2
AvailabilityZone1:
Type: String
Default: ap-northeast-2a
AvailabilityZone2:
Type: String
Default: ap-northeast-2b
AvailabilityZone3:
Type: String
Default: ap-northeast-2c
Vpc1Block:
Type: String
Default: 192.168.0.0/16
Vpc1PublicSubnet1Block:
Type: String
Default: 192.168.1.0/24
Vpc1PublicSubnet2Block:
Type: String
Default: 192.168.2.0/24
Vpc1PublicSubnet3Block:
Type: String
Default: 192.168.3.0/24
Vpc1PrivateSubnet1Block:
Type: String
Default: 192.168.11.0/24
Vpc1PrivateSubnet2Block:
Type: String
Default: 192.168.12.0/24
Vpc1PrivateSubnet3Block:
Type: String
Default: 192.168.13.0/24
Vpc2Block:
Type: String
Default: 172.20.0.0/16
Vpc2PublicSubnet1Block:
Type: String
Default: 172.20.1.0/24
Vpc2PrivateSubnet1Block:
Type: String
Default: 172.20.11.0/24
Resources:
# VPC1
EksVPC:
Type: AWS::EC2::VPC
Properties:
CidrBlock: !Ref Vpc1Block
EnableDnsSupport: true
EnableDnsHostnames: true
Tags:
- Key: Name
Value: !Sub ${ClusterBaseName}-VPC
# Vpc1PublicSubnets
Vpc1PublicSubnet1:
Type: AWS::EC2::Subnet
Properties:
AvailabilityZone: !Ref AvailabilityZone1
CidrBlock: !Ref Vpc1PublicSubnet1Block
VpcId: !Ref EksVPC
MapPublicIpOnLaunch: true
Tags:
- Key: Name
Value: !Sub ${ClusterBaseName}-Vpc1PublicSubnet1
- Key: kubernetes.io/role/elb
Value: 1
Vpc1PublicSubnet2:
Type: AWS::EC2::Subnet
Properties:
AvailabilityZone: !Ref AvailabilityZone2
CidrBlock: !Ref Vpc1PublicSubnet2Block
VpcId: !Ref EksVPC
MapPublicIpOnLaunch: true
Tags:
- Key: Name
Value: !Sub ${ClusterBaseName}-Vpc1PublicSubnet2
- Key: kubernetes.io/role/elb
Value: 1
Vpc1PublicSubnet3:
Type: AWS::EC2::Subnet
Properties:
AvailabilityZone: !Ref AvailabilityZone3
CidrBlock: !Ref Vpc1PublicSubnet3Block
VpcId: !Ref EksVPC
MapPublicIpOnLaunch: true
Tags:
- Key: Name
Value: !Sub ${ClusterBaseName}-Vpc1PublicSubnet3
- Key: kubernetes.io/role/elb
Value: 1
Vpc1InternetGateway:
Type: AWS::EC2::InternetGateway
Vpc1GatewayAttachment:
Type: AWS::EC2::VPCGatewayAttachment
Properties:
InternetGatewayId: !Ref Vpc1InternetGateway
VpcId: !Ref EksVPC
Vpc1PublicSubnetRouteTable:
Type: AWS::EC2::RouteTable
Properties:
VpcId: !Ref EksVPC
Tags:
- Key: Name
Value: !Sub ${ClusterBaseName}-Vpc1PublicSubnetRouteTable
Vpc1PublicSubnetRoute:
Type: AWS::EC2::Route
Properties:
RouteTableId: !Ref Vpc1PublicSubnetRouteTable
DestinationCidrBlock: 0.0.0.0/0
GatewayId: !Ref Vpc1InternetGateway
Vpc1PublicSubnet1RouteTableAssociation:
Type: AWS::EC2::SubnetRouteTableAssociation
Properties:
SubnetId: !Ref Vpc1PublicSubnet1
RouteTableId: !Ref Vpc1PublicSubnetRouteTable
Vpc1PublicSubnet2RouteTableAssociation:
Type: AWS::EC2::SubnetRouteTableAssociation
Properties:
SubnetId: !Ref Vpc1PublicSubnet2
RouteTableId: !Ref Vpc1PublicSubnetRouteTable
Vpc1PublicSubnet3RouteTableAssociation:
Type: AWS::EC2::SubnetRouteTableAssociation
Properties:
SubnetId: !Ref Vpc1PublicSubnet3
RouteTableId: !Ref Vpc1PublicSubnetRouteTable
# Vpc1PrivateSubnets
Vpc1PrivateSubnet1:
Type: AWS::EC2::Subnet
Properties:
AvailabilityZone: !Ref AvailabilityZone1
CidrBlock: !Ref Vpc1PrivateSubnet1Block
VpcId: !Ref EksVPC
Tags:
- Key: Name
Value: !Sub ${ClusterBaseName}-Vpc1PrivateSubnet1
- Key: kubernetes.io/role/internal-elb
Value: 1
Vpc1PrivateSubnet2:
Type: AWS::EC2::Subnet
Properties:
AvailabilityZone: !Ref AvailabilityZone2
CidrBlock: !Ref Vpc1PrivateSubnet2Block
VpcId: !Ref EksVPC
Tags:
- Key: Name
Value: !Sub ${ClusterBaseName}-Vpc1PrivateSubnet2
- Key: kubernetes.io/role/internal-elb
Value: 1
Vpc1PrivateSubnet3:
Type: AWS::EC2::Subnet
Properties:
AvailabilityZone: !Ref AvailabilityZone3
CidrBlock: !Ref Vpc1PrivateSubnet3Block
VpcId: !Ref EksVPC
Tags:
- Key: Name
Value: !Sub ${ClusterBaseName}-Vpc1PrivateSubnet3
- Key: kubernetes.io/role/internal-elb
Value: 1
Vpc1PrivateSubnetRouteTable:
Type: AWS::EC2::RouteTable
Properties:
VpcId: !Ref EksVPC
Tags:
- Key: Name
Value: !Sub ${ClusterBaseName}-Vpc1PrivateSubnetRouteTable
Vpc1PrivateSubnet1RouteTableAssociation:
Type: AWS::EC2::SubnetRouteTableAssociation
Properties:
SubnetId: !Ref Vpc1PrivateSubnet1
RouteTableId: !Ref Vpc1PrivateSubnetRouteTable
Vpc1PrivateSubnet2RouteTableAssociation:
Type: AWS::EC2::SubnetRouteTableAssociation
Properties:
SubnetId: !Ref Vpc1PrivateSubnet2
RouteTableId: !Ref Vpc1PrivateSubnetRouteTable
Vpc1PrivateSubnet3RouteTableAssociation:
Type: AWS::EC2::SubnetRouteTableAssociation
Properties:
SubnetId: !Ref Vpc1PrivateSubnet3
RouteTableId: !Ref Vpc1PrivateSubnetRouteTable
# VPC2
OpsVPC:
Type: AWS::EC2::VPC
Properties:
CidrBlock: !Ref Vpc2Block
EnableDnsSupport: true
EnableDnsHostnames: true
Tags:
- Key: Name
Value: !Sub ${OperatorBaseName}-VPC
# Vpc2PublicSubnets
Vpc2PublicSubnet1:
Type: AWS::EC2::Subnet
Properties:
AvailabilityZone: !Ref AvailabilityZone1
CidrBlock: !Ref Vpc2PublicSubnet1Block
VpcId: !Ref OpsVPC
MapPublicIpOnLaunch: true
Tags:
- Key: Name
Value: !Sub ${OperatorBaseName}-Vpc2PublicSubnet1
Vpc2InternetGateway:
Type: AWS::EC2::InternetGateway
Vpc2GatewayAttachment:
Type: AWS::EC2::VPCGatewayAttachment
Properties:
InternetGatewayId: !Ref Vpc2InternetGateway
VpcId: !Ref OpsVPC
Vpc2PublicSubnetRouteTable:
Type: AWS::EC2::RouteTable
Properties:
VpcId: !Ref OpsVPC
Tags:
- Key: Name
Value: !Sub ${OperatorBaseName}-Vpc2PublicSubnetRouteTable
Vpc2PublicSubnetRoute:
Type: AWS::EC2::Route
Properties:
RouteTableId: !Ref Vpc2PublicSubnetRouteTable
DestinationCidrBlock: 0.0.0.0/0
GatewayId: !Ref Vpc2InternetGateway
Vpc2PublicSubnet1RouteTableAssociation:
Type: AWS::EC2::SubnetRouteTableAssociation
Properties:
SubnetId: !Ref Vpc2PublicSubnet1
RouteTableId: !Ref Vpc2PublicSubnetRouteTable
# Vpc2PrivateSubnets
Vpc2PrivateSubnet1:
Type: AWS::EC2::Subnet
Properties:
AvailabilityZone: !Ref AvailabilityZone1
CidrBlock: !Ref Vpc2PrivateSubnet1Block
VpcId: !Ref OpsVPC
Tags:
- Key: Name
Value: !Sub ${OperatorBaseName}-Vpc2PrivateSubnet1
Vpc2PrivateSubnetRouteTable:
Type: AWS::EC2::RouteTable
Properties:
VpcId: !Ref OpsVPC
Tags:
- Key: Name
Value: !Sub ${OperatorBaseName}-Vpc2PrivateSubnetRouteTable
Vpc2PrivateSubnet1RouteTableAssociation:
Type: AWS::EC2::SubnetRouteTableAssociation
Properties:
SubnetId: !Ref Vpc2PrivateSubnet1
RouteTableId: !Ref Vpc2PrivateSubnetRouteTable
# VPC Peering
VPCPeering:
Type: AWS::EC2::VPCPeeringConnection
Properties:
VpcId: !Ref EksVPC
PeerVpcId: !Ref OpsVPC
Tags:
- Key: Name
Value: VPCPeering-EksVPC-OpsVPC
PeeringRoute1:
Type: AWS::EC2::Route
Properties:
DestinationCidrBlock: 172.20.0.0/16
RouteTableId: !Ref Vpc1PublicSubnetRouteTable
VpcPeeringConnectionId: !Ref VPCPeering
PeeringRoute2:
Type: AWS::EC2::Route
Properties:
DestinationCidrBlock: 192.168.0.0/16
RouteTableId: !Ref Vpc2PublicSubnetRouteTable
VpcPeeringConnectionId: !Ref VPCPeering
# # IAM 역할 생성
# EC2SessionManagerRole:
# Type: AWS::IAM::Role
# Properties:
# RoleName: EC2SessionManagerRole
# AssumeRolePolicyDocument:
# Version: 2012-10-17
# Statement:
# - Effect: Allow
# Principal:
# Service:
# - ec2.amazonaws.com
# Action: sts:AssumeRole
# ManagedPolicyArns: # 필요한 경우 관리형 정책 추가
# - arn:aws:iam::aws:policy/AmazonSSMManagedInstanceCore # SSM Agent에 필요한 권한
# #- arn:aws:iam::aws:policy/CloudWatchLogsFullAccess # CloudWatch Logs에 대한 권한 (선택 사항)
# # 인스턴스 프로파일 생성 및 IAM 역할 연결
# EC2InstanceProfile:
# Type: AWS::IAM::InstanceProfile
# Properties:
# InstanceProfileName: EC2SessionManagerInstanceProfile
# Roles:
# - !Ref EC2SessionManagerRole
# # EKSCTL-Host
# EKSEC2SG:
# Type: AWS::EC2::SecurityGroup
# Properties:
# GroupDescription: eksctl-host Security Group
# VpcId: !Ref EksVPC
# Tags:
# - Key: Name
# Value: !Sub ${ClusterBaseName}-HOST-SG
# SecurityGroupIngress:
# - IpProtocol: '-1'
# CidrIp: !Ref SgIngressSshCidr
# - IpProtocol: '-1'
# CidrIp: 172.20.0.0/16
# EKSEC2:
# Type: AWS::EC2::Instance
# Properties:
# InstanceType: !Ref MyInstanceType
# # IamInstanceProfile: !Ref EC2InstanceProfile
# ImageId: !Ref LatestAmiId
# KeyName: !Ref KeyName
# Tags:
# - Key: Name
# Value: !Sub ${ClusterBaseName}-host
# NetworkInterfaces:
# - DeviceIndex: 0
# SubnetId: !Ref Vpc1PublicSubnet1
# GroupSet:
# - !Ref EKSEC2SG
# AssociatePublicIpAddress: true
# PrivateIpAddress: 192.168.1.100
# BlockDeviceMappings:
# - DeviceName: /dev/xvda
# Ebs:
# VolumeType: gp3
# VolumeSize: 30
# DeleteOnTermination: true
# UserData:
# Fn::Base64:
# !Sub |
# #!/bin/bash
# hostnamectl --static set-hostname "${ClusterBaseName}-host"
# # Config convenience
# echo 'alias vi=vim' >> /etc/profile
# echo "sudo su -" >> /home/ec2-user/.bashrc
# sed -i "s/UTC/Asia\/Seoul/g" /etc/sysconfig/clock
# ln -sf /usr/share/zoneinfo/Asia/Seoul /etc/localtime
# # Install Packages
# yum -y install tree jq git htop
# # Install kubectl & helm
# cd /root
# install -o root -g root -m 0755 kubectl /usr/local/bin/kubectl
# # Install eksctl
# curl -sL "https://github.com/eksctl-io/eksctl/releases/latest/download/eksctl_Linux_amd64.tar.gz" | tar xz -C /tmp
# mv /tmp/eksctl /usr/local/bin
# # Install aws cli v2
# curl "https://awscli.amazonaws.com/awscli-exe-linux-x86_64.zip" -o "awscliv2.zip"
# unzip awscliv2.zip >/dev/null 2>&1
# ./aws/install
# complete -C '/usr/local/bin/aws_completer' aws
# echo 'export AWS_PAGER=""' >>/etc/profile
# # Install krew
# curl -L https://github.com/kubernetes-sigs/krew/releases/download/v0.4.4/krew-linux_amd64.tar.gz -o /root/krew-linux_amd64.tar.gz
# tar zxvf krew-linux_amd64.tar.gz
# ./krew-linux_amd64 install krew
# export PATH="$PATH:/root/.krew/bin"
# echo 'export PATH="$PATH:/root/.krew/bin"' >> /etc/profile
# # Install kube-ps1
# echo 'source <(kubectl completion bash)' >> /etc/profile
# echo 'alias k=kubectl' >> /etc/profile
# echo 'complete -F __start_kubectl k' >> /etc/profile
# git clone https://github.com/jonmosco/kube-ps1.git /root/kube-ps1
# cat <<"EOT" >> /root/.bash_profile
# source /root/kube-ps1/kube-ps1.sh
# KUBE_PS1_SYMBOL_ENABLE=false
# function get_cluster_short() {
# echo "$1" | cut -d . -f1
# }
# KUBE_PS1_CLUSTER_FUNCTION=get_cluster_short
# KUBE_PS1_SUFFIX=') '
# PS1='$(kube_ps1)'$PS1
# EOT
# # Install krew plugin
# kubectl krew install ctx ns get-all neat # ktop df-pv mtail tree
# # Install Docker
# amazon-linux-extras install docker -y
# systemctl start docker && systemctl enable docker
# # Install Kubecolor
# wget https://github.com/kubecolor/kubecolor/releases/download/v0.5.0/kubecolor_0.5.0_linux_amd64.tar.gz
# tar -zxvf kubecolor_0.5.0_linux_amd64.tar.gz
# mv kubecolor /usr/local/bin/
# OPS-Host
OPSSG:
Type: AWS::EC2::SecurityGroup
Properties:
GroupDescription: Operator-host Security Group
VpcId: !Ref OpsVPC
Tags:
- Key: Name
Value: !Sub ${OperatorBaseName}-HOST-SG
SecurityGroupIngress:
- IpProtocol: '-1'
CidrIp: !Ref SgIngressSshCidr
- IpProtocol: '-1'
CidrIp: 192.168.0.0/16
OPSEC2:
Type: AWS::EC2::Instance
Properties:
InstanceType: !Ref MyInstanceType
# IamInstanceProfile: !Ref EC2InstanceProfile
ImageId: !Ref LatestAmiId
KeyName: !Ref KeyName
Tags:
- Key: Name
Value: !Sub ${OperatorBaseName}-host
NetworkInterfaces:
- DeviceIndex: 0
SubnetId: !Ref Vpc2PublicSubnet1
GroupSet:
- !Ref OPSSG
AssociatePublicIpAddress: true
PrivateIpAddress: 172.20.1.100
BlockDeviceMappings:
- DeviceName: /dev/xvda
Ebs:
VolumeType: gp3
VolumeSize: 30
DeleteOnTermination: true
UserData:
Fn::Base64:
!Sub |
#!/bin/bash
hostnamectl --static set-hostname "${OperatorBaseName}-host"
# Config convenience
echo 'alias vi=vim' >> /etc/profile
echo "sudo su -" >> /home/ec2-user/.bashrc
sed -i "s/UTC/Asia\/Seoul/g" /etc/sysconfig/clock
ln -sf /usr/share/zoneinfo/Asia/Seoul /etc/localtime
# Install Packages
yum -y install tree jq git htop
# Install kubectl & helm
cd /root
install -o root -g root -m 0755 kubectl /usr/local/bin/kubectl
# Install eksctl
curl -sL "https://github.com/eksctl-io/eksctl/releases/latest/download/eksctl_Linux_amd64.tar.gz" | tar xz -C /tmp
mv /tmp/eksctl /usr/local/bin
# Install aws cli v2
curl "https://awscli.amazonaws.com/awscli-exe-linux-x86_64.zip" -o "awscliv2.zip"
unzip awscliv2.zip >/dev/null 2>&1
./aws/install
complete -C '/usr/local/bin/aws_completer' aws
echo 'export AWS_PAGER=""' >>/etc/profile
# Install krew
curl -L https://github.com/kubernetes-sigs/krew/releases/download/v0.4.4/krew-linux_amd64.tar.gz -o /root/krew-linux_amd64.tar.gz
tar zxvf krew-linux_amd64.tar.gz
./krew-linux_amd64 install krew
export PATH="$PATH:/root/.krew/bin"
echo 'export PATH="$PATH:/root/.krew/bin"' >> /etc/profile
# Install kube-ps1
echo 'source <(kubectl completion bash)' >> /etc/profile
echo 'alias k=kubectl' >> /etc/profile
echo 'complete -F __start_kubectl k' >> /etc/profile
git clone https://github.com/jonmosco/kube-ps1.git /root/kube-ps1
cat <<"EOT" >> /root/.bash_profile
source /root/kube-ps1/kube-ps1.sh
KUBE_PS1_SYMBOL_ENABLE=false
function get_cluster_short() {
echo "$1" | cut -d . -f1
}
KUBE_PS1_CLUSTER_FUNCTION=get_cluster_short
KUBE_PS1_SUFFIX=') '
PS1='$(kube_ps1)'$PS1
EOT
# Install krew plugin
kubectl krew install ctx ns get-all neat # ktop df-pv mtail tree
# Install Docker
amazon-linux-extras install docker -y
systemctl start docker && systemctl enable docker
# Install Kubecolor
wget https://github.com/kubecolor/kubecolor/releases/download/v0.5.0/kubecolor_0.5.0_linux_amd64.tar.gz
tar -zxvf kubecolor_0.5.0_linux_amd64.tar.gz
mv kubecolor /usr/local/bin/
Outputs:
eksctlhost:
Value: !GetAtt OPSEC2.PublicIp
* 배포된 리소스 정보 확인 : 운영서버 EC2, VPC(DNS 설정 옵션), VPC Peering, Routing Table
더보기

운영 EC2에 지정한 key로 정상 접속 확인

myeks-VPC (서브넷 6개, 라우팅 테이블 2개, igw 1개)

operator-VPC (subnet 2개, 라우팅테이블 2개, igw 1개)

두 VPC가 VPC Peering으로 연결되어 있고 라우팅 테이블에 등록 됨
0-2) eksctl 을 통해 EKS 배포 (Windows WSL2)
#
export CLUSTER_NAME=myeks

# myeks-VPC/Subnet 정보 확인 및 변수 지정
export VPCID=$(aws ec2 describe-vpcs --filters "Name=tag:Name,Values=$CLUSTER_NAME-VPC" --query 'Vpcs[*].VpcId' --output text)
echo $VPCID

export PubSubnet1=$(aws ec2 describe-subnets --filters Name=tag:Name,Values="$CLUSTER_NAME-Vpc1PublicSubnet1" --query "Subnets[0].[SubnetId]" --output text)
export PubSubnet2=$(aws ec2 describe-subnets --filters Name=tag:Name,Values="$CLUSTER_NAME-Vpc1PublicSubnet2" --query "Subnets[0].[SubnetId]" --output text)
export PubSubnet3=$(aws ec2 describe-subnets --filters Name=tag:Name,Values="$CLUSTER_NAME-Vpc1PublicSubnet3" --query "Subnets[0].[SubnetId]" --output text)
echo $PubSubnet1 $PubSubnet2 $PubSubnet3

# 출력된 내용 참고 : 아래 yaml 파일 참고해서 vpc/subnet id, ssh key 경로 수정
eksctl create cluster --name $CLUSTER_NAME --region=ap-northeast-2 --nodegroup-name=ng1 --node-type=t3.medium --nodes 3 --node-volume-size=30 --vpc-public-subnets "$PubSubnet1","$PubSubnet2","$PubSubnet3" --version 1.31 --with-oidc --external-dns-access --full-ecr-access --alb-ingress-access --node-ami-family AmazonLinux2023 --ssh-access --dry-run > myeks.yaml


-------------------------------------------
# 미사용
export PrivateSubnet1=$(aws ec2 describe-subnets --filters Name=tag:Name,Values="$CLUSTER_NAME-Vpc1PrivateSubnet1" --query "Subnets[0].[SubnetId]" --output text)
export PrivateSubnet2=$(aws ec2 describe-subnets --filters Name=tag:Name,Values="$CLUSTER_NAME-Vpc1PrivateSubnet2" --query "Subnets[0].[SubnetId]" --output text)
export PrivateSubnet3=$(aws ec2 describe-subnets --filters Name=tag:Name,Values="$CLUSTER_NAME-Vpc1PrivateSubnet3" --query "Subnets[0].[SubnetId]" --output text)
echo $PrivateSubnet1 $PrivateSubnet2 $PrivateSubnet3

# ssh 퍼블릭 키 경로 지정
SshPublic=<각자 자신의 ssh 퍼블릭 키 경로>
SshPublic=~/.ssh/kp-gasida.pub
echo $SshPublic
eksctl create cluster --name $CLUSTER_NAME --region=ap-northeast-2 --nodegroup-name=ng1 --node-type=t3.medium --nodes 3 --node-volume-size=30 --vpc-public-subnets "$PubSubnet1","$PubSubnet2","$PubSubnet3" --version 1.31 --with-oidc --external-dns-access --full-ecr-access --alb-ingress-access --node-ami-family AmazonLinux2023 --ssh-access --ssh-public-key $SshPublic --dry-run > myeks.yaml
* 배포할 yaml 파일 작성 (ssm 접속은 기본값 적용됨)
더보기
apiVersion: eksctl.io/v1alpha5
kind: ClusterConfig
metadata:
name: myeks
region: ap-northeast-2
version: "1.31"
kubernetesNetworkConfig:
ipFamily: IPv4
iam:
vpcResourceControllerPolicy: true
withOIDC: true
accessConfig:
authenticationMode: API_AND_CONFIG_MAP
vpc:
autoAllocateIPv6: false
cidr: 192.168.0.0/16
clusterEndpoints:
privateAccess: true # if you only want to allow private access to the cluster
publicAccess: true # if you want to allow public access to the cluster
id: vpc-0ab40d2acbda845d8 # 각자 환경 정보로 수정
manageSharedNodeSecurityGroupRules: true # if you want to manage the rules of the shared node security group
nat:
gateway: Disable
subnets:
public:
ap-northeast-2a:
az: ap-northeast-2a
cidr: 192.168.1.0/24
id: subnet-014dc12ab7042f604 # 각자 환경 정보로 수정
ap-northeast-2b:
az: ap-northeast-2b
cidr: 192.168.2.0/24
id: subnet-01ba554d3b16a15a7 # 각자 환경 정보로 수정
ap-northeast-2c:
az: ap-northeast-2c
cidr: 192.168.3.0/24
id: subnet-0868f7093cbb17c34 # 각자 환경 정보로 수정
addons:
- name: vpc-cni # no version is specified so it deploys the default version
version: latest # auto discovers the latest available
attachPolicyARNs: # attach IAM policies to the add-on's service account
- arn:aws:iam::aws:policy/AmazonEKS_CNI_Policy
configurationValues: |-
enableNetworkPolicy: "true"
- name: kube-proxy
version: latest
- name: coredns
version: latest
- name: metrics-server
version: latest
privateCluster:
enabled: false
skipEndpointCreation: false
managedNodeGroups:
- amiFamily: AmazonLinux2023
desiredCapacity: 3
disableIMDSv1: true
disablePodIMDS: false
iam:
withAddonPolicies:
albIngress: false # Disable ALB Ingress Controller
appMesh: false
appMeshPreview: false
autoScaler: false
awsLoadBalancerController: true # Enable AWS Load Balancer Controller
certManager: true # Enable cert-manager
cloudWatch: false
ebs: false
efs: false
externalDNS: true # Enable ExternalDNS
fsx: false
imageBuilder: true
xRay: false
instanceSelector: {}
instanceType: t3.medium
preBootstrapCommands:
# install additional packages
- "dnf install nvme-cli links tree tcpdump sysstat ipvsadm ipset bind-utils htop -y"
# disable hyperthreading
- "for n in $(cat /sys/devices/system/cpu/cpu*/topology/thread_siblings_list | cut -s -d, -f2- | tr ',' '\n' | sort -un); do echo 0 > /sys/devices/system/cpu/cpu${n}/online; done"
labels:
alpha.eksctl.io/cluster-name: myeks
alpha.eksctl.io/nodegroup-name: ng1
maxSize: 3
minSize: 3
name: ng1
privateNetworking: false
releaseVersion: ""
securityGroups:
withLocal: null
withShared: null
ssh:
allow: true
publicKeyName: kp-gasida # 각자 환경 정보로 수정
tags:
alpha.eksctl.io/nodegroup-name: ng1
alpha.eksctl.io/nodegroup-type: managed
volumeIOPS: 3000
volumeSize: 30
volumeThroughput: 125
volumeType: gp3
* 최종 yaml 로 eks 배포
# kubeconfig 파일 경로 위치 지정 :
export KUBECONFIG=$HOME/kubeconfig
혹은 각자 편한 경로 위치에 파일 지정
export KUBECONFIG=~/Downloads/kubeconfig

# 배포
eksctl create cluster -f myeks.yaml --verbose 4
0-3) 배포 후 기본 정보 확인
* EKS 관리 콘솔 확인
- OIDC 공급자, AL2023 AMI, Public + Private 엔드포인트 구성 확인

- VPC CNI Add-on
VPC CNI에 할당된 Role 정책 확인
AmazonEKSCNIPolicy : EC2 네트워크 인터페이스와 관련된 작업을 처리하는 권한
|

* EKS 정보 확인
#
kubectl cluster-info
eksctl get cluster

# 네임스페이스 default 변경 적용
kubens default

#
kubectl ctx
cat $KUBECONFIG | grep current-context
kubectl config rename-context "<각자 자신의 IAM User>@myeks.ap-northeast-2.eksctl.io" "eksworkshop"
kubectl config rename-context "admin@myeks.ap-northeast-2.eksctl.io" "eksworkshop"
cat $KUBECONFIG | grep current-context

#
kubectl get node --label-columns=node.kubernetes.io/instance-type,eks.amazonaws.com/capacityType,topology.kubernetes.io/zone
kubectl get node -v=6

#
kubectl get pod -A
kubectl get pdb -n kube-system
NAME             MIN AVAILABLE   MAX UNAVAILABLE   ALLOWED DISRUPTIONS   AGE
coredns          N/A             1                 1                     28m
metrics-server   N/A             1                 1                     28m

# 관리형 노드 그룹 확인
eksctl get nodegroup --cluster $CLUSTER_NAME
aws eks describe-nodegroup --cluster-name $CLUSTER_NAME --nodegroup-name ng1 | jq

# eks addon 확인
eksctl get addon --cluster $CLUSTER_NAME
NAME            VERSION                 STATUS  ISSUES  IAMROLE                                                          UPDATE AVAILABLE CONFIGURATION VALUES            POD IDENTITY ASSOCIATION ROLES
coredns         v1.11.4-eksbuild.2      ACTIVE  0
kube-proxy      v1.31.3-eksbuild.2      ACTIVE  0
metrics-server  v0.7.2-eksbuild.1       ACTIVE  0
vpc-cni         v1.19.2-eksbuild.1      ACTIVE  0       arn:aws:iam::911283464785:role/eksctl-myeks-addon-vpc-cni-Role1-WqTaK0VjADcW                              enableNetworkPolicy: "true
실행 결과
더보기

AL2023 AMI 기반 t3.medium type 관리형 노드 그룹

# 관리형 노드 그룹 확인
# eks addon 확인
coredns, kube-proxy, metrics-server, vpc-cni 4개가 기본으로 설치된 것을 확인
0-4) 관리형 노드 그룹(EC2) 접속 및 노드 정보 확인
# 인스턴스 공인 IP 확인
aws ec2 describe-instances --query "Reservations[*].Instances[*].{InstanceID:InstanceId, PublicIPAdd:PublicIpAddress, PrivateIPAdd:PrivateIpAddress, InstanceName:Tags[?Key=='Name']|[0].Value, Status:State.Name}" --filters Name=instance-state-name,Values=running --output table

# 인스턴스 공인 IP 변수 지정
export N1=<az1 배치된 EC2 공인 IP>
export N2=<az2 배치된 EC2 공인 IP>
export N3=<az3 배치된 EC2 공인 IP>
export N1=43.203.169.0
export N2=13.125.28.29
export N3=13.125.255.7
echo $N1, $N2, $N3

# ping 테스트
ping -c 2 $N1
ping -c 2 $N2

# *nodegroup-ng1* 포함된 보안그룹 ID
export MNSGID=<각자 자신의 관리형 노드 그룹(EC2) 에 보안그룹 ID>
export MNSGID=sg-075e2e6178557c95a

# 해당 보안그룹 inbound 에 자신의 집 공인 IP 룰 추가
aws ec2 authorize-security-group-ingress --group-id $MNSGID --protocol '-1' --cidr $(curl -s ipinfo.io/ip)/32

# 해당 보안그룹 inbound 에 운영서버 내부 IP 룰 추가
aws ec2 authorize-security-group-ingress --group-id $MNSGID --protocol '-1' --cidr 172.20.1.100/32

# AWS EC2 관리 콘솔에서 EC2에 보안 그룹에 inbound rule 에 추가된 규칙 정보 확인


# ping 테스트
ping -c 2 $N1
ping -c 2 $N2

# 워커 노드 SSH 접속
ssh -i <SSH 키> -o StrictHostKeyChecking=no ec2-user@$N1 hostname
for i in $N1 $N2 $N3; do echo ">> node $i <<"; ssh -o StrictHostKeyChecking=no ec2-user@$i hostname; echo; done

ssh ec2-user@$N1
exit
ssh ec2-user@$N2
exit
ssh ec2-user@$N2
exit

------------------
# 운영서버 EC2에서 접속 시

## 인스턴스 공인 IP 변수 지정
export N1=<az1 배치된 EC2 내부 IP>
export N2=<az2 배치된 EC2 내부 IP>
export N3=<az3 배치된 EC2 내부 IP>
export N1=192.168.1.186
export N2=192.168.2.123
export N3=192.168.3.174
echo $N1, $N2, $N3

## ping 테스트
ping -c 2 $N1
ping -c 2 $N2
<실습 결과>
더보기


보안 그룹에 정책 허용 후 ping 정상

내 PC에서 ssh 접속 확인

운영 EC2에서 ping 확인
* 노드 정보 확인
# 노드 정보 확인
for i in $N1 $N2 $N3; do echo ">> node $i <<"; ssh ec2-user@$i hostnamectl; echo; done
for i in $N1 $N2 $N3; do echo ">> node $i <<"; ssh ec2-user@$i sudo ip -c addr; echo; done
for i in $N1 $N2 $N3; do echo ">> node $i <<"; ssh ec2-user@$i sudo ip -c route; echo; done
for i in $N1 $N2 $N3; do echo ">> node $i <<"; ssh ec2-user@$i sudo iptables -t nat -S; echo; done

# Node cgroup version : v1(tmpfs), v2(cgroup2fs) - Link
for i in $N1 $N2 $N3; do echo ">> node $i <<"; ssh ec2-user@$i stat -fc %T /sys/fs/cgroup/; echo; done
for i in $N1 $N2 $N3; do echo ">> node $i <<"; ssh ec2-user@$i findmnt -t cgroup2; echo; done

#
for i in $N1 $N2 $N3; do echo ">> node $i <<"; ssh ec2-user@$i sudo systemctl status kubelet; echo; done
for i in $N1 $N2 $N3; do echo ">> node $i <<"; ssh ec2-user@$i ps axf |grep /usr/bin/containerd; echo; done
for i in $N1 $N2 $N3; do echo ">> node $i <<"; ssh ec2-user@$i sudo tree /etc/kubernetes/kubelet/; echo; done
for i in $N1 $N2 $N3; do echo ">> node $i <<"; ssh ec2-user@$i sudo cat /etc/kubernetes/kubelet/config.json | jq; echo; done
for i in $N1 $N2 $N3; do echo ">> node $i <<"; ssh ec2-user@$i sudo cat /etc/kubernetes/kubelet/config.json.d/00-nodeadm.conf | jq; echo; done

#
for i in $N1 $N2 $N3; do echo ">> node $i <<"; ssh ec2-user@$i lsblk; echo; done
for i in $N1 $N2 $N3; do echo ">> node $i <<"; ssh ec2-user@$i df -hT /; echo; done

# 컨테이너 리스트 확인
for i in $N1 $N2 $N3; do echo ">> node $i <<"; ssh ec2-user@$i sudo ctr -n k8s.io container list; echo; done
CONTAINER                                                           IMAGE                                                                                          RUNTIME
28b6a15c475e32cd8777c1963ba684745573d0b6053f80d2d37add0ae841eb45    602401143452.dkr.ecr-fips.us-east-1.amazonaws.com/eks/pause:3.5                                io.containerd.runc.v2
4f266ebcee45b133c527df96499e01ec0c020ea72785eb10ef63b20b5826cf7c    602401143452.dkr.ecr-fips.us-east-1.amazonaws.com/eks/pause:3.5                                io.containerd.runc.v2
...

# 컨테이너 이미지 확인
for i in $N1 $N2 $N3; do echo ">> node $i <<"; ssh ec2-user@$i sudo ctr -n k8s.io image list --quiet; echo; done
...

# 태스크 리스트 확인
for i in $N1 $N2 $N3; do echo ">> node $i <<"; ssh ec2-user@$i sudo ctr -n k8s.io task list; echo; done
<실습 결과>
더보기

인스턴스 타입 당 할당 가능한 POD 수량이 정해져 있다

al2023은 기본적으로 ens5, ens6를 사용하므로 모니터링 등 작업시 변경 필요

AL2023은 기본으로 cgroup v2를 사용

네트워킹을 위한 기본 컨테이너들이 기동됨
0-5) 관리형 노드 그룹(EC2) 접속 및 노드 정보 확인
- 아래와 같이 aws 자격 증명 등록 후 kubeconfig를 받아올 수 있다.
# eks 설치한 iam 자격증명을 설정하기
aws configure
...

# get-caller-identity 확인
aws sts get-caller-identity --query Arn

# kubeconfig 생성
cat ~/.kube/config
aws eks update-kubeconfig --name myeks --user-alias <위 출력된 자격증명 사용자>
aws eks update-kubeconfig --name myeks --user-alias admin

# 추가된 kubeconfig 정보 확인
cat ~/.kube/config

# eks api dig 조회 : VPC 내부에서 질의하는데 왜 그럴까? private hosted zone 의 특징을 알아보자
APIDNS=$(aws eks describe-cluster --name myeks | jq -r .cluster.endpoint | cut -d '/' -f 3)
dig +short $APIDNS

#
kubectl cluster-info
kubectl ns default
kubectl get node -v6
* VPC 피어링으로 연결된 Operator EC2에서 엔드포인트 조회
- 조회 결과 공인 IP가 나온다. VPC 피어링으로 확장만되어 있지 Private Hosted Zone DNS 질의를 할 수 없다.

1. AWS VPC CNI 소개
1-1) CNI(Container Network Interface)
. 컨테이너들 간의 네트워크 연결을 관리하는 인터페이스
. IP 할당, 네트워크 연결, 네트워크 정책 적용 등의 역할을 수행
. Calico, Flannel, Cilium 등
1-2) AWS VPC CNI
. 2가지 컴포넌트
. CNI Binary : Pod간 통신이 가능하도록 하고, 노드의 root 파일 시스템 상에서 동작하면서 새로운 Pod가 기동되거나 중지될 때 kubelet에 의해 호출됨


. ipamd: 노드 로컬 IP 주소 관리 데몬으로 ENI를 관리하고 사용 가능한 ip 주소 pool을 유지함


. VPC와 통합 : VPC Flow logs, VPC 라우팅 정책, 보안 그룹을 사용 가능
1-3) Calico CNI와 AWS VPC CNI 비교
* AWS VPC CNI는 네트워크 통신 최적화(성능, 지연)를 위해 오버레이(VXLAN, IP-IP 등) 통신하지 않고 동일 대역으로 직접 통신함


1-4) 워커 노드에 생성 가능한 최대 파드 개수
- Node Instance 타입 당 붙을 수 있는 ENI 수와 할당 가능 IP 수가 제한되어 있음
1. Secondary IPv4 addresses : 인스턴스 유형에 최대 ENI 갯수와 할당 가능 IP 수를 조합하여 선정
2. IPv4 Prefix Delegation : IPv4 28bit 서브넷(prefix)를 위임하여 할당 가능 IP 수와 인스턴스 유형에 권장하는 최대 갯수로 선정
3. AWS VPC CNI Custom Networking : 노드와 파드 대역 분리, 파드에 별도 서브넷 부여 후 사용
* 제가 운영하는 시스템에서는 "3. AWS VPC CNI Custiom Networking"을 사용하여 노드와 파드 대역 서브넷을 분리하여 사용하고 있습니다.

1-5) 네트워크 기본 정보 확인
# CNI 정보 확인
kubectl describe daemonset aws-node --namespace kube-system | grep Image | cut -d "/" -f 2

# kube-proxy config 확인 : 모드 iptables 사용 >> ipvs 모드로 변경 해보자!
kubectl describe cm -n kube-system kube-proxy-config
...
mode: "iptables"
...

# 노드 IP 확인
aws ec2 describe-instances --query "Reservations[*].Instances[*].{PublicIPAdd:PublicIpAddress,PrivateIPAdd:PrivateIpAddress,InstanceName:Tags[?Key=='Name']|[0].Value,Status:State.Name}" --filters Name=instance-state-name,Values=running --output table

# 파드 IP 확인
kubectl get pod -n kube-system -o=custom-columns=NAME:.metadata.name,IP:.status.podIP,STATUS:.status.phase

# 파드 이름 확인
kubectl get pod -A -o name

# 파드 갯수 확인
kubectl get pod -A -o name | wc -l
<실습 결과>
더보기

* 노드 ip와 aws-node(aws vpc cni), kube-proxy는 같은 ENI 공유하기 때문에 IP가 똑같음
1-6) 노드 정보 확인
# CNI 정보 확인
for i in $N1 $N2 $N3; do echo ">> node $i <<"; ssh ec2-user@$i tree /var/log/aws-routed-eni; echo; done
ssh ec2-user@$N1 sudo cat /var/log/aws-routed-eni/plugin.log | jq
ssh ec2-user@$N1 sudo cat /var/log/aws-routed-eni/ipamd.log | jq
ssh ec2-user@$N1 sudo cat /var/log/aws-routed-eni/egress-v6-plugin.log | jq
ssh ec2-user@$N1 sudo cat /var/log/aws-routed-eni/ebpf-sdk.log | jq
ssh ec2-user@$N1 sudo cat /var/log/aws-routed-eni/network-policy-agent.log | jq

# 네트워크 정보 확인 : eniY는 pod network 네임스페이스와 veth pair
for i in $N1 $N2 $N3; do echo ">> node $i <<"; ssh ec2-user@$i sudo ip -br -c addr; echo; done
for i in $N1 $N2 $N3; do echo ">> node $i <<"; ssh ec2-user@$i sudo ip -c addr; echo; done
for i in $N1 $N2 $N3; do echo ">> node $i <<"; ssh ec2-user@$i sudo ip -c route; echo; done
ssh ec2-user@$N1 sudo iptables -t nat -S
ssh ec2-user@$N1 sudo iptables -t nat -L -n -v
<실습 결과>
더보기

pod network 네임스페이스와 veth pair

IP Pool 정보, IP 붙이는 로그 확인 가능
2. 노드에서 기본 네트워크 정보 확인

. Network 네임스페이스는 호스트(Root)와 파드 별(Per Pod)로 구분
. 특정한 파드(kube-proxy, aws-node)는 호스트(Root)의 IP를 그대로 사용
. t3.medium 의 경우 ENI 마다 최대 6개의 IP를 가질 수 있음
. ENI0, ENI1 으로 2개의 ENI는 자신의 IP 이외에 추가적으로 5개의 보조 프라이빗 IP를 가질 수 있음
. coredns 파드는 veth 으로 호스트에는 eniY@ifN 인터페이스와 파드에 eth0 과 연결되어 있음
2-1) 보조 IPv4 주소를 파드가 사용하는지 확인
# [터미널1~3] 노드 모니터링
ssh ec2-user@$N1
watch -d "ip link | egrep 'ens|eni' ;echo;echo "[ROUTE TABLE]"; route -n | grep eni"

ssh ec2-user@$N2
watch -d "ip link | egrep 'ens|eni' ;echo;echo "[ROUTE TABLE]"; route -n | grep eni"

ssh ec2-user@$N3
watch -d "ip link | egrep 'ens|eni' ;echo;echo "[ROUTE TABLE]"; route -n | grep eni"

# 테스트용 netshoot-pod 디플로이먼트 생성
cat <<EOF | kubectl apply -f -
apiVersion: apps/v1
kind: Deployment
metadata:
  name: netshoot-pod
spec:
  replicas: 3
  selector:
    matchLabels:
      app: netshoot-pod
  template:
    metadata:
      labels:
        app: netshoot-pod
    spec:
      containers:
      - name: netshoot-pod
        image: nicolaka/netshoot
        command: ["tail"]
        args: ["-f", "/dev/null"]
      terminationGracePeriodSeconds: 0
EOF

# 파드 이름 변수 지정
PODNAME1=$(kubectl get pod -l app=netshoot-pod -o jsonpath='{.items[0].metadata.name}')
PODNAME2=$(kubectl get pod -l app=netshoot-pod -o jsonpath='{.items[1].metadata.name}')
PODNAME3=$(kubectl get pod -l app=netshoot-pod -o jsonpath='{.items[2].metadata.name}')

# 파드 확인
kubectl get pod -o wide
kubectl get pod -o=custom-columns=NAME:.metadata.name,IP:.status.podIP

# 노드에 라우팅 정보 확인
for i in $N1 $N2 $N3; do echo ">> node $i <<"; ssh ec2-user@$i sudo ip -c route; echo; done
<실습 결과>
더보기

Pod 가 생성되면, 워커 노드에 eni~ 추가되고 라우팅 테이블에도 추가됨
2-2) 테스트용 파드 eniY 정보 확인
# 노드1에서 네트워크 인터페이스 정보 확인
ssh ec2-user@$N1
----------------
ip -br -c addr show
ip -c link
ip -c addr
ip route # 혹은 route -n

# 네임스페이스 정보 출력 -t net(네트워크 타입)
sudo lsns -t net

# PID 정보로 파드 정보 확인
PID=<PID>  # PID 높은 것 중 COMMAND가 pause 인것
sudo nsenter -t $PID -n ip -c addr
sudo nsenter -t $PID -n ip -c route

exit
----------------
<실습결과>

2-3) 테스트용 파드 접속(exec) 후 확인

3. 노드 간 파드 통신
- Pod 간 통신은 AWS VPC CNI 경우 별도 오버레이 통신 없이 VPC Native하게 파드간 직접 통신 가능


3-1) Pod 간 통신 테스트 및 확인 실습 (별도 NAT 없이 통신)
# 파드 IP 변수 지정
PODIP1=$(kubectl get pod -l app=netshoot-pod -o jsonpath='{.items[0].status.podIP}')
PODIP2=$(kubectl get pod -l app=netshoot-pod -o jsonpath='{.items[1].status.podIP}')
PODIP3=$(kubectl get pod -l app=netshoot-pod -o jsonpath='{.items[2].status.podIP}')

# 파드1 Shell 에서 파드2로 ping 테스트
kubectl exec -it $PODNAME1 -- ping -c 2 $PODIP2

# 파드2 Shell 에서 파드3로 ping 테스트
kubectl exec -it $PODNAME2 -- ping -c 2 $PODIP3

# 파드3 Shell 에서 파드1로 ping 테스트
kubectl exec -it $PODNAME3 -- ping -c 2 $PODIP1

# 워커 노드 EC2 : TCPDUMP 확인
## For Pod to external (outside VPC) traffic, we will program iptables to SNAT using Primary IP address on the Primary ENI.
sudo tcpdump -i any -nn icmp
sudo tcpdump -i ens5 -nn icmp
sudo tcpdump -i ens6 -nn icmp
sudo tcpdump -i eniYYYYYYYY -nn icmp

[워커 노드1]
# routing policy database management 확인
ip rule

# routing table management 확인
ip route show table local

# 디폴트 네트워크 정보를 ens5 을 통해서 빠져나간다
ip route show table main
default via 192.168.1.1 dev ens5
...
<실습 결과>

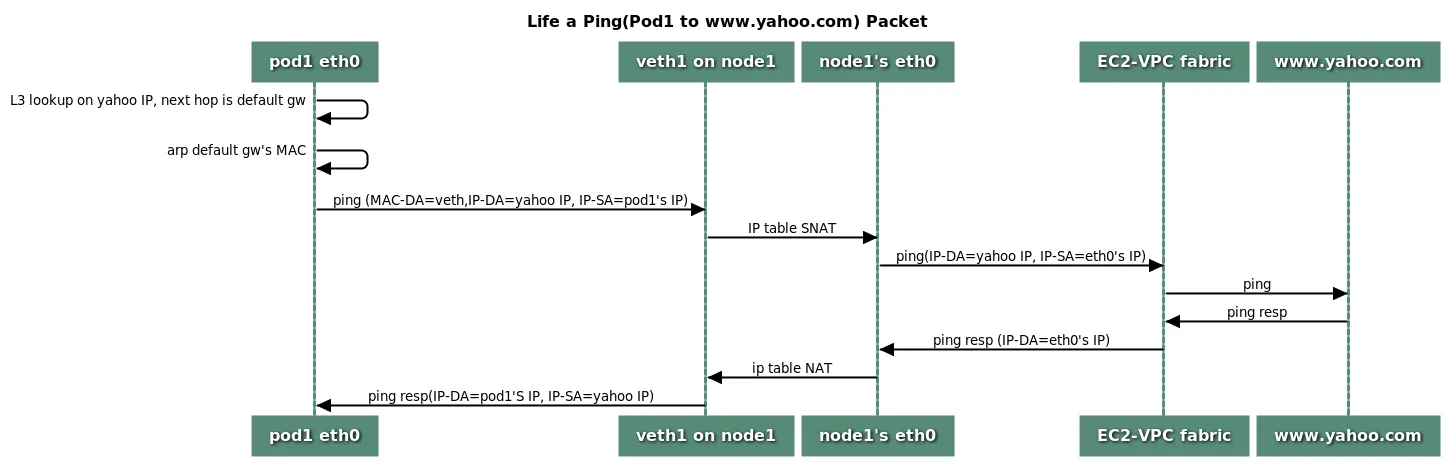
4. 파드에서 외부 통신
- iptable에 SNAT를 통해 노드의 eth0(ens5) IP로 변경되어 외부와 통신
* VPC CNI 의 External SNAT 설정에 따라, 외부(인터넷) 통신 시 SNAT 하거나 혹은 SNAT 없이 통신 가능
4-1) Pod에서 외부 통신 테스트 및 확인
# pod-1 Shell 에서 외부로 ping
kubectl exec -it $PODNAME1 -- ping -c 1 www.google.com
kubectl exec -it $PODNAME1 -- ping -i 0.1 www.google.com
kubectl exec -it $PODNAME1 -- ping -i 0.1 8.8.8.8

# 워커 노드 EC2 : TCPDUMP 확인
sudo tcpdump -i any -nn icmp
sudo tcpdump -i ens5 -nn icmp

# 퍼블릭IP 확인
for i in $N1 $N2 $N3; do echo ">> node $i <<"; ssh ec2-user@$i curl -s ipinfo.io/ip; echo; echo; done

# 작업용 EC2 : pod-1 Shell 에서 외부 접속 확인 - 공인IP는 어떤 주소인가?
## The right way to check the weather - 링크
for i in $PODNAME1 $PODNAME2 $PODNAME3; do echo ">> Pod : $i <<"; kubectl exec -it $i -- curl -s ipinfo.io/ip; echo; echo; done
kubectl exec -it $PODNAME1 -- curl -s wttr.in/seoul
kubectl exec -it $PODNAME1 -- curl -s wttr.in/seoul?format=3
kubectl exec -it $PODNAME1 -- curl -s wttr.in/Moon
kubectl exec -it $PODNAME1 -- curl -s wttr.in/:help


# 워커 노드 EC2
## 출력된 결과를 보고 어떻게 빠져나가는지 고민해보자!
ip rule
ip route show table main
sudo iptables -L -n -v -t nat
sudo iptables -t nat -S

# 파드가 외부와 통신시에는 아래 처럼 'AWS-SNAT-CHAIN-0' 룰(rule)에 의해서 SNAT 되어서 외부와 통신!
# 참고로 뒤 IP는 eth0(ENI 첫번째)의 IP 주소이다
# --random-fully 동작 - 링크1  링크2
sudo iptables -t nat -S | grep 'A AWS-SNAT-CHAIN'
-A AWS-SNAT-CHAIN-0 ! -d 192.168.0.0/16 -m comment --comment "AWS SNAT CHAIN" -j RETURN
-A AWS-SNAT-CHAIN-0 ! -o vlan+ -m comment --comment "AWS, SNAT" -m addrtype ! --dst-type LOCAL -j SNAT --to-source 192.168.1.251 --random-fully

## 아래 'mark 0x4000/0x4000' 매칭되지 않아서 RETURN 됨!
-A KUBE-POSTROUTING -m mark ! --mark 0x4000/0x4000 -j RETURN
-A KUBE-POSTROUTING -j MARK --set-xmark 0x4000/0x0
-A KUBE-POSTROUTING -m comment --comment "kubernetes service traffic requiring SNAT" -j MASQUERADE --random-fully
...

# 카운트 확인 시 AWS-SNAT-CHAIN-0에 매칭되어, 목적지가 192.168.0.0/16 아니고 외부 빠져나갈때 SNAT 192.168.1.251(EC2 노드1 IP) 변경되어 나간다!
sudo iptables -t filter --zero; sudo iptables -t nat --zero; sudo iptables -t mangle --zero; sudo iptables -t raw --zero
watch -d 'sudo iptables -v --numeric --table nat --list AWS-SNAT-CHAIN-0; echo ; sudo iptables -v --numeric --table nat --list KUBE-POSTROUTING; echo ; sudo iptables -v --numeric --table nat --list POSTROUTING'

# conntrack 확인 : EC2 메타데이터 주소(169.254.169.254) 제외 출력
for i in $N1 $N2 $N3; do echo ">> node $i <<"; ssh ec2-user@$i sudo conntrack -L -n |grep -v '169.254.169'; echo; done
conntrack v1.4.5 (conntrack-tools):
icmp     1 28 src=172.30.66.58 dst=8.8.8.8 type=8 code=0 id=34392 src=8.8.8.8 dst=172.30.85.242 type=0 code=0 id=50705 mark=128 use=1
tcp      6 23 TIME_WAIT src=172.30.66.58 dst=34.117.59.81 sport=58144 dport=80 src=34.117.59.81 dst=172.30.85.242 sport=80 dport=44768 [ASSURED] mark=128 use=1
<실습 결과>


4-1) Pod에서 운영 서버 통신 테스트 및 확인
* 운영 서버 -> Pod
# 운영서버 EC2 SSH 접속
ssh <운영서버 EC2 공인 IP>
-----------------------
POD1IP=<파드1 IP 지정>
POD1IP=192.168.1.101

ping -c 1 $POD1IP

exit
-----------------------

# 워커노드1 에서 tcpdump 확인 : NAT 동작 적용 여유 확인
sudo tcpdump -i any -nn icmp

* Pod -> 운영서버
# vpc cni env 정보 확인
kubectl get ds aws-node -n kube-system -o json | jq '.spec.template.spec.containers[0].env'
...
  {
    "name": "AWS_VPC_K8S_CNI_EXTERNALSNAT",
    "value": "false"
  },
...

# 운영서버 EC2 SSH 접속
kubectl exec -it $PODNAME1 -- ping 172.20.1.100

# 파드1 배치 워커노드에서 tcpdump 확인 : NAT 동작 적용 여유 확인
sudo tcpdump -i any -nn icmp

# 운영서버 EC2 에서 tcpdump 확인 : NAT 동작 적용 여유 확인
sudo tcpdump -i any -nn icmp

-----------------------------------------------------

# 파드1 배치 워커노드 : NAT 적용 정책 확인
sudo iptables -t filter --zero; sudo iptables -t nat --zero; sudo iptables -t mangle --zero; sudo iptables -t raw --zero
watch -d 'sudo iptables -v --numeric --table nat --list AWS-SNAT-CHAIN-0; echo ; sudo iptables -v --numeric --table nat --list KUBE-POSTROUTING; echo ; sudo iptables -v --numeric --table nat --list POSTROUTING'
* SNAT 없이 통신하게 설정하기
# 파드 상태 모니터링
# kubectl set env 명령어는 내부적으로 kubectl patch를 실행하여 PodSpec을 변경 → 이로 인해 aws-node 데몬셋이 자동으로 롤링 업데이트
watch -d kubectl get pod -n kube-system

# 파드1 배치 워커노드 iptables rule 모니터링 : iptables rule 추가됨
watch -d 'sudo iptables -v --numeric --table nat --list AWS-SNAT-CHAIN-0; echo ; sudo iptables -v --numeric --table nat --list KUBE-POSTROUTING; echo ; sudo iptables -v --numeric --table nat --list POSTROUTING'

# 사내 내부에 연결 확장된 네트워크 대역과 SNAT 없이 통신 가능하게 설정
kubectl set env daemonset aws-node -n kube-system AWS_VPC_K8S_CNI_EXCLUDE_SNAT_CIDRS=172.20.0.0/16

#
kubectl get ds aws-node -n kube-system -o json | jq '.spec.template.spec.containers[0].env'
...
  {
    "name": "AWS_VPC_K8S_CNI_EXCLUDE_SNAT_CIDRS",
    "value": "172.20.0.0/16"
  }

# 운영서버 EC2 SSH 접속
kubectl exec -it $PODNAME1 -- ping 172.20.1.100

# 파드1 배치 워커노드 : NAT 적용 정책 확인
sudo iptables -t filter --zero; sudo iptables -t nat --zero; sudo iptables -t mangle --zero; sudo iptables -t raw --zero
watch -d 'sudo iptables -v --numeric --table nat --list AWS-SNAT-CHAIN-0; echo ; sudo iptables -v --numeric --table nat --list KUBE-POSTROUTING; echo ; sudo iptables -v --numeric --table nat --list POSTROUTING'
Chain AWS-SNAT-CHAIN-0 (1 references)
 pkts bytes target     prot opt in     out     source               destination
    1    84 RETURN     all  --  *      *       0.0.0.0/0            172.20.0.0/16        /* AWS SNAT CHAIN EXCLUSION */
  730 45228 RETURN     all  --  *      *       0.0.0.0/0            192.168.0.0/16	 /* AWS SNAT CHAIN */
...
=> aws-vpc-cni-config configmap에 환경변수를 설정하거나 aws-node 데몬셋의 환경 변수를 직접 수정하여 재배포하면 설정 유지 가능
5. 노드에 파드 생성 갯수 제한
* 가시화해서 보기 위해 kube-ops-view를 설치함
# kube-ops-view
helm repo add geek-cookbook https://geek-cookbook.github.io/charts/
helm install kube-ops-view geek-cookbook/kube-ops-view --version 1.2.2 --set service.main.type=LoadBalancer --set env.TZ="Asia/Seoul" --namespace kube-system

# kube-ops-view 접속 URL 확인 (1.5 배율)
kubectl get svc -n kube-system kube-ops-view -o jsonpath='{.status.loadBalancer.ingress[0].hostname}' | awk '{ print "KUBE-OPS-VIEW URL = http://"$1":8080/#scale=1.5"}'
=> 결과로 나오는 url로 접속하면 브라우저에서 시각적으로 확인 가능
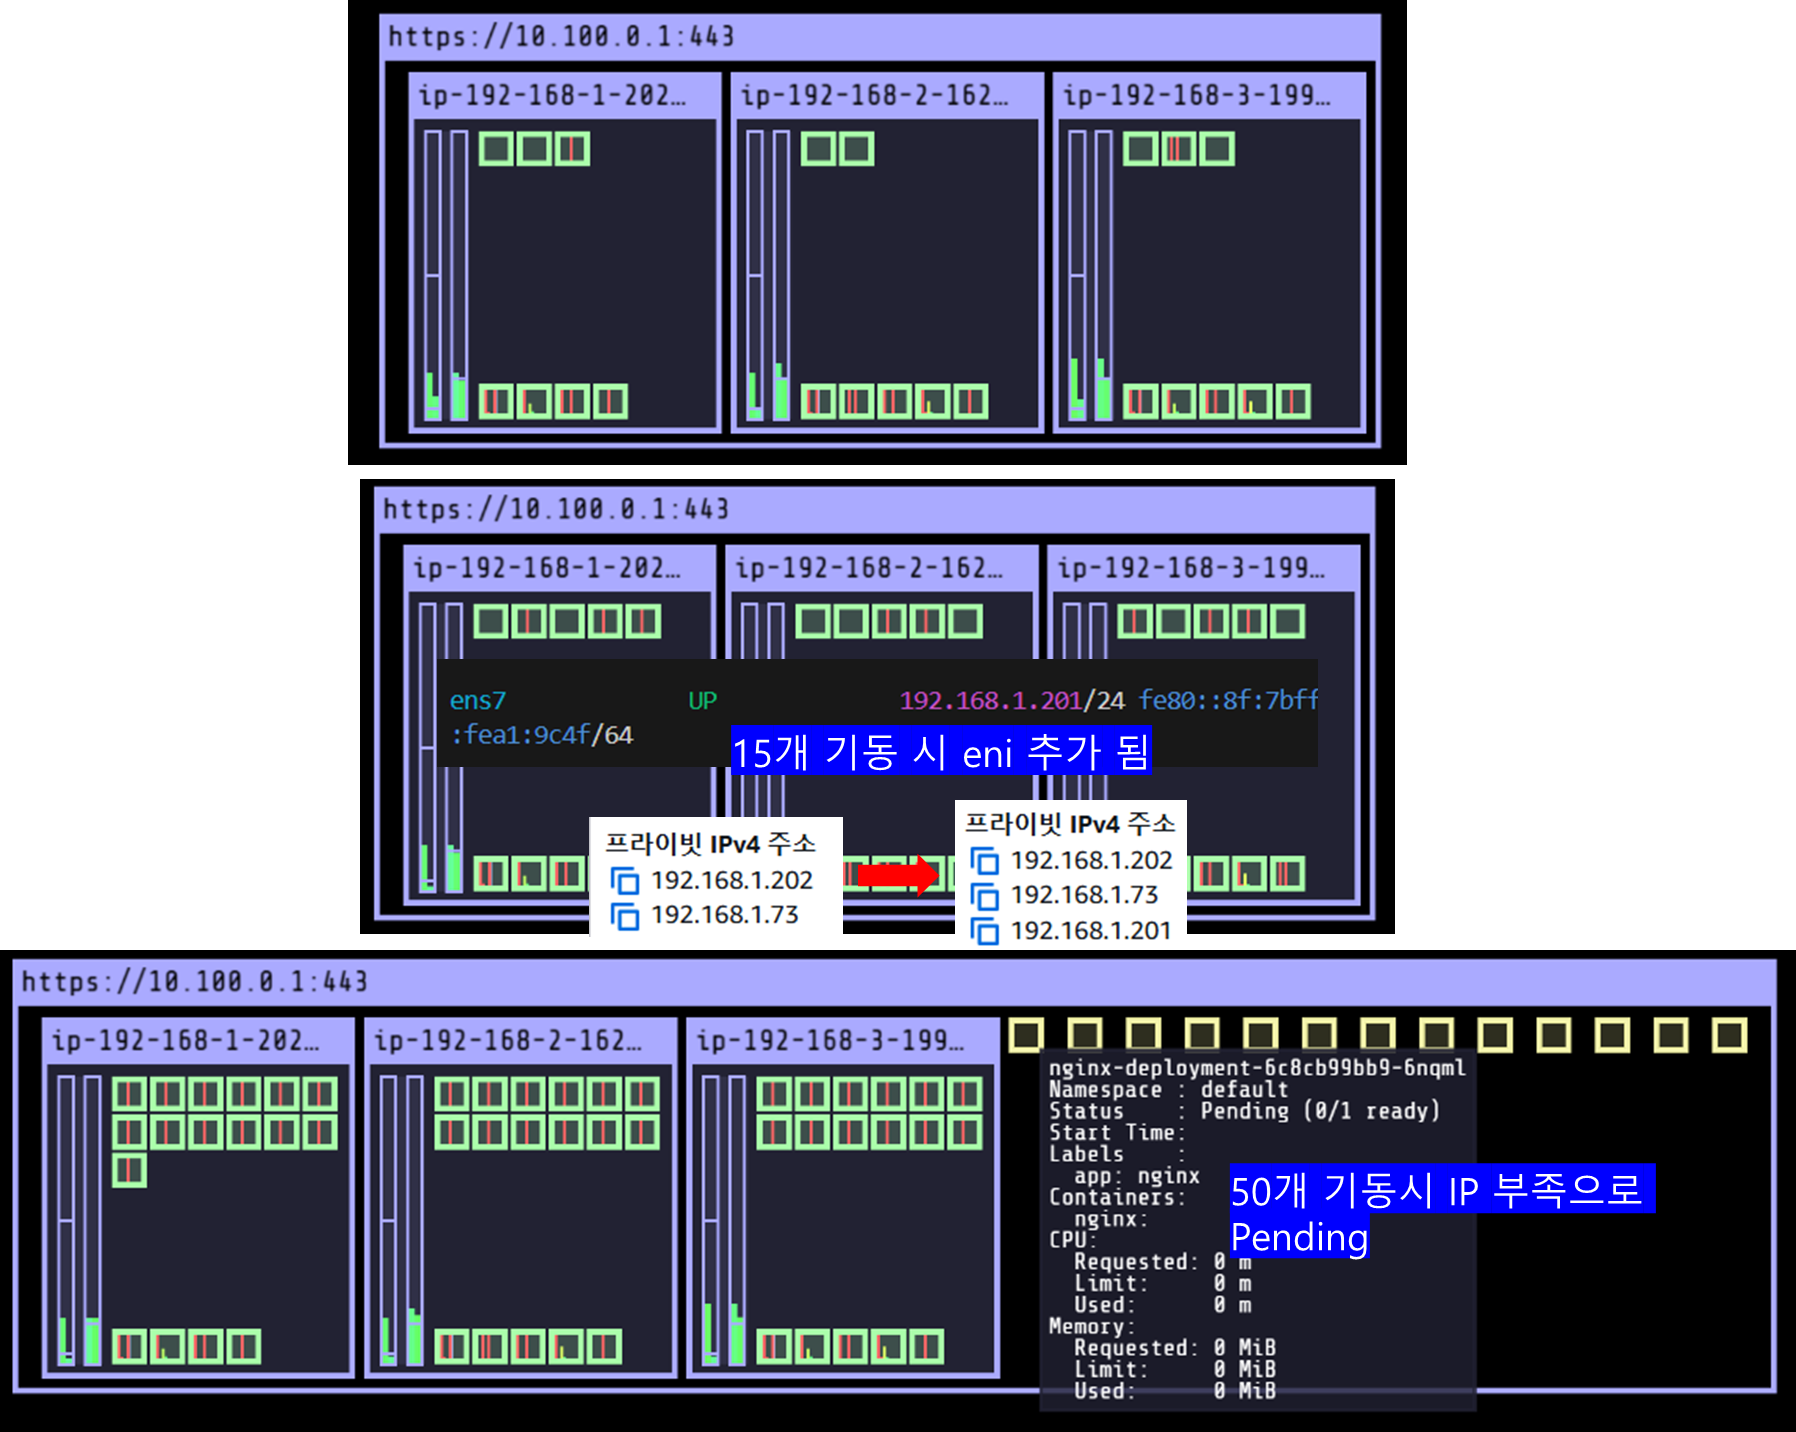
별도 설정이 없다면 Secondary IPv4 address 방식으로 인스턴스 타입 별 ENI 최대 개수와 할당 가능한 최대 IP 수에 따라 최대 Pod 수가 결정됨 (* aws-node(aws-vpc-cni)와 kube-proxy 파드는 노드의 NIC을 공유하여 사용하므로 최대 갯수에서 제외)

실습 환경의 경우 노드(t3.medium) 당 최대 15개 IP가 할당 가능함
[수식 : 최대 ENI 수 * (ENI 당 할당 가능한 IP 수 - 1) + 2]
<최대 Pod 개수 확인 방법>
더보기
# t3 타입의 정보(필터) 확인
aws ec2 describe-instance-types --filters Name=instance-type,Values=t3.\* \
--query "InstanceTypes[].{Type: InstanceType, MaxENI: NetworkInfo.MaximumNetworkInterfaces, IPv4addr: NetworkInfo.Ipv4AddressesPerInterface}" \
--output table
--------------------------------------
| DescribeInstanceTypes |
+----------+----------+--------------+
| IPv4addr | MaxENI | Type |
+----------+----------+--------------+
| 15 | 4 | t3.2xlarge |
| 6 | 3 | t3.medium |
| 12 | 3 | t3.large |
| 15 | 4 | t3.xlarge |
| 2 | 2 | t3.micro |
| 2 | 2 | t3.nano |
| 4 | 3 | t3.small |
+----------+----------+--------------+
# c5 타입의 정보(필터) 확인
aws ec2 describe-instance-types --filters Name=instance-type,Values=c5\*.\* \
--query "InstanceTypes[].{Type: InstanceType, MaxENI: NetworkInfo.MaximumNetworkInterfaces, IPv4addr: NetworkInfo.Ipv4AddressesPerInterface}" \
--output table
# 파드 사용 가능 계산 예시 : aws-node 와 kube-proxy 파드는 host-networking 사용으로 IP 2개 남음
((MaxENI * (IPv4addr-1)) + 2)
t3.medium 경우 : ((3 * (6 - 1) + 2 ) = 17개 >> aws-node 와 kube-proxy 2개 제외하면 15개
# 워커노드 상세 정보 확인 : 노드 상세 정보의 Allocatable 에 pods 에 17개 정보 확인
kubectl describe node | grep Allocatable: -A6
Allocatable:
cpu: 1930m
ephemeral-storage: 27905944324
hugepages-1Gi: 0
hugepages-2Mi: 0
memory: 3388360Ki
pods: 17
5-1) 최대 파드 생성 및 확인 실습
# 워커 노드 3대 EC2 - 모니터링
while true; do ip -br -c addr show && echo "--------------" ; date "+%Y-%m-%d %H:%M:%S" ; sleep 1; done

# 터미널1
watch -d 'kubectl get pods -o wide'

# 터미널2
## 디플로이먼트 생성
cat <<EOF | kubectl apply -f -
apiVersion: apps/v1
kind: Deployment
metadata:
  name: nginx-deployment
  labels:
    app: nginx
spec:
  replicas: 2
  selector:
    matchLabels:
      app: nginx
  template:
    metadata:
      labels:
        app: nginx
    spec:
      containers:
      - name: nginx
        image: nginx:alpine
        ports:
        - containerPort: 80
EOF

# 파드 확인
kubectl get pod -o wide
kubectl get pod -o=custom-columns=NAME:.metadata.name,IP:.status.podIP

# 파드 증가 테스트 >> 파드 정상 생성 확인, 워커 노드에서 eth, eni 갯수 확인
kubectl scale deployment nginx-deployment --replicas=8

# 파드 증가 테스트 >> 파드 정상 생성 확인, 워커 노드에서 eth, eni 갯수 확인 >> 어떤일이 벌어졌는가?
kubectl scale deployment nginx-deployment --replicas=15

# 파드 증가 테스트 >> 파드 정상 생성 확인, 워커 노드에서 eth, eni 갯수 확인 >> 어떤일이 벌어졌는가?
kubectl scale deployment nginx-deployment --replicas=30

# 파드 증가 테스트 >> 파드 정상 생성 확인, 워커 노드에서 eth, eni 갯수 확인 >> 어떤일이 벌어졌는가?
kubectl scale deployment nginx-deployment --replicas=50

# 파드 생성 실패!
kubectl get pods | grep Pending
nginx-deployment-7fb7fd49b4-d4bk9   0/1     Pending   0          3m37s
nginx-deployment-7fb7fd49b4-qpqbm   0/1     Pending   0          3m37s
...

kubectl describe pod <Pending 파드> | grep Events: -A5
Events:
  Type     Reason            Age   From               Message
  ----     ------            ----  ----               -------
  Warning  FailedScheduling  45s   default-scheduler  0/3 nodes are available: 1 node(s) had untolerated taint {node-role.kubernetes.io/control-plane: }, 2 Too many pods. preemption: 0/3 nodes are available: 1 Preemption is not helpful for scheduling, 2 No preemption victims found for incoming pod.

# 디플로이먼트 삭제
kubectl delete deploy nginx-deployment
<실습 결과>
* 노드에 배포할 수 있는 Pod 최대 수 제한는 IP 주소 수가 주요한 요인이지만, vCPU 30 미만 ec2 타입은 노드에 최대 110개 제한이 되고 vCPU 30 이상의 타입은 최대 250개 제한을 권고함
* ip 부족시 해결 방법으로는 Prefix Delegation, WARM & MIN IP/Prefix Targets(초기 eni를 몇개 붙일지, ENI당 얼마나 pool할지 등), Custom Network (Pod 대역과 노드 대역의 분리) 가 있음
6. Service & AWS LoadBalancer Controller
- 서비스
. 파드에 고정 IP와 도메인 네임을 제공함으로써 기동/중지됨에 따라 변경되는 Pod IP에 대응하여 요청을 엔드포인트에 전달함
. 부하분산 제공
. 라벨 기반 포트 포워드(포트 : 타겟포트) 제공
- 서비스 종류
. Cluster IP : 클러스터 내부 서비스 접속

. NodePort : 클러스터 외부에서 노드IP:NodePort로 접속 가능. 모든 노드에 동일하게 열림

. LoadBalancer : NodePort, ClusterIP를 포함하며, On-premise, CSP 제공 LB 서비스와 결합하여 외부에서 클러스터로 접속할 수 있도록함

* LoadBalancer는 어떻게 프로비저닝되는가?
1) 서비스 생성 요청 -> LoadBalancer 타입 서비스 생성
2) AWS ELB 생성 -> cloud-controller-manager가 AWS API 호출로 ELB(CLB, NLB, ALB) 생성
3) ELB와 클러스터 연결 -> k8s의 노드로 트래픽 전달 설정
. NLB 모드 에 따른 트래픽 흐름
- 인스턴스 유형 : 노드 포트로 전달

- IP 모드 : 특정 pod로 전달 (반드시 AWS LoadBalancer 컨트롤러 설치 및 정책 설정 필요)

. Proxy Protocol v2 비활성화 : NLB에서 바로 Pod로 전달, Client IP가 NLB IP로 SNAT되어 Client IP 확인 불가
. Proxy Protocol v2 활성화 : NLB에서 바로 Pod로 전달, Client IP 확인 가능 (단, 어플리케이션이 인지할 수 있게 설정 필요)


- Kube-Proxy 모드
. 서비스 통신 동작 설정 관리
- 유저 스페이스 Proxy 모드 : 사용자 영역에서 kube-proxy가 동작하여 커널 <-> 유저 영역 간 컨텍스트 스위칭으로 비효율적임
- iptables proxy 모드 (기본값) : 커널 영역에서 넷필터 정책 적용을 통해 통신 처리, 부하 분산 알고리즘 미제공, 규칙이 많아 지면 지연 발생
- IPVS proxy 모드 : IPVS는 넷필터에서 동작하는 L4 LB로 처리성능이 높고 규칙 수를 줄일 수 있음
6-1) AWS LoadBalancer Cotroller 배포
# 설치 전 CRD 확인
kubectl get crd

# Helm Chart 설치
helm repo add eks https://aws.github.io/eks-charts
helm repo update
helm install aws-load-balancer-controller eks/aws-load-balancer-controller -n kube-system --set clusterName=$CLUSTER_NAME


## 설치 확인
kubectl get crd
kubectl explain ingressclassparams.elbv2.k8s.aws
kubectl explain targetgroupbindings.elbv2.k8s.aws

kubectl get deployment -n kube-system aws-load-balancer-controller
kubectl describe deploy -n kube-system aws-load-balancer-controller
kubectl describe deploy -n kube-system aws-load-balancer-controller | grep 'Service Account'
  Service Account:  aws-load-balancer-controller

# 클러스터롤, 롤 확인
kubectl describe clusterrolebindings.rbac.authorization.k8s.io aws-load-balancer-controller-rolebinding
kubectl describe clusterroles.rbac.authorization.k8s.io aws-load-balancer-controller-role
...
PolicyRule:
  Resources                                     Non-Resource URLs  Resource Names  Verbs
  ---------                                     -----------------  --------------  -----
  targetgroupbindings.elbv2.k8s.aws             []                 []              [create delete get list patch update watch]
  events                                        []                 []              [create patch]
  ingresses                                     []                 []              [get list patch update watch]
  services                                      []                 []              [get list patch update watch]
  ingresses.extensions                          []                 []              [get list patch update watch]
  services.extensions                           []                 []              [get list patch update watch]
  ingresses.networking.k8s.io                   []                 []              [get list patch update watch]
  services.networking.k8s.io                    []                 []              [get list patch update watch]
  endpoints                                     []                 []              [get list watch]
  namespaces                                    []                 []              [get list watch]
  nodes                                         []                 []              [get list watch]
  pods                                          []                 []              [get list watch]
  endpointslices.discovery.k8s.io               []                 []              [get list watch]
  ingressclassparams.elbv2.k8s.aws              []                 []              [get list watch]
  ingressclasses.networking.k8s.io              []                 []              [get list watch]
  ingresses/status                              []                 []              [update patch]
  pods/status                                   []                 []              [update patch]
  services/status                               []                 []              [update patch]
  targetgroupbindings/status                    []                 []              [update patch]
  ingresses.elbv2.k8s.aws/status                []                 []              [update patch]
  pods.elbv2.k8s.aws/status                     []                 []              [update patch]
  services.elbv2.k8s.aws/status                 []                 []              [update patch]
  targetgroupbindings.elbv2.k8s.aws/status      []                 []              [update patch]
  ingresses.extensions/status                   []                 []              [update patch]
  pods.extensions/status                        []                 []              [update patch]
  services.extensions/status                    []                 []              [update patch]
  targetgroupbindings.extensions/status         []                 []              [update patch]
  ingresses.networking.k8s.io/status            []                 []              [update patch]
  pods.networking.k8s.io/status                 []                 []              [update patch]
  services.networking.k8s.io/status             []                 []              [update patch]
  targetgroupbindings.networking.k8s.io/status  []                 []              [update patch]
=> 타겟 그룹 추가 등 외부 통신 정책 설정을 위한 권한을 가지고 있음
6-2) 서비스/파드 배포 테스트 (NLB)
# 모니터링
watch -d kubectl get pod,svc,ep,endpointslices

# 디플로이먼트 & 서비스 생성
cat << EOF > echo-service-nlb.yaml
apiVersion: apps/v1
kind: Deployment
metadata:
  name: deploy-echo
spec:
  replicas: 2
  selector:
    matchLabels:
      app: deploy-websrv
  template:
    metadata:
      labels:
        app: deploy-websrv
    spec:
      terminationGracePeriodSeconds: 0
      containers:
      - name: aews-websrv
        image: k8s.gcr.io/echoserver:1.5
        ports:
        - containerPort: 8080
---
apiVersion: v1
kind: Service
metadata:
  name: svc-nlb-ip-type
  annotations:
    service.beta.kubernetes.io/aws-load-balancer-nlb-target-type: ip
    service.beta.kubernetes.io/aws-load-balancer-scheme: internet-facing
    service.beta.kubernetes.io/aws-load-balancer-healthcheck-port: "8080"
    service.beta.kubernetes.io/aws-load-balancer-cross-zone-load-balancing-enabled: "true"
spec:
  ports:
    - port: 80
      targetPort: 8080
      protocol: TCP
  type: LoadBalancer
  loadBalancerClass: service.k8s.aws/nlb
  selector:
    app: deploy-websrv
EOF
kubectl apply -f echo-service-nlb.yaml


# 확인
aws elbv2 describe-load-balancers --query 'LoadBalancers[*].State.Code' --output text
kubectl get deploy,pod
kubectl get svc,ep,ingressclassparams,targetgroupbindings
kubectl get targetgroupbindings -o json | jq

# AWS 관리콘솔에서 NLB 정보 확인
# 빠른 실습을 위해서 등록 취소 지연(드레이닝 간격) 수정 : 기본값 300초
echo-service-nlb.yaml 파일 IDE(VS code)에서 수정
..
apiVersion: v1
kind: Service
metadata:
  name: svc-nlb-ip-type
  annotations:
    service.beta.kubernetes.io/aws-load-balancer-nlb-target-type: ip
    service.beta.kubernetes.io/aws-load-balancer-scheme: internet-facing
    service.beta.kubernetes.io/aws-load-balancer-healthcheck-port: "8080"
    service.beta.kubernetes.io/aws-load-balancer-cross-zone-load-balancing-enabled: "true"
    service.beta.kubernetes.io/aws-load-balancer-target-group-attributes: deregistration_delay.timeout_seconds=60
...
kubectl apply -f echo-service-nlb.yaml

# AWS ELB(NLB) 정보 확인
aws elbv2 describe-load-balancers | jq
aws elbv2 describe-load-balancers --query 'LoadBalancers[*].State.Code' --output text
ALB_ARN=$(aws elbv2 describe-load-balancers --query 'LoadBalancers[?contains(LoadBalancerName, `k8s-default-svcnlbip`) == `true`].LoadBalancerArn' | jq -r '.[0]')
aws elbv2 describe-target-groups --load-balancer-arn $ALB_ARN | jq
TARGET_GROUP_ARN=$(aws elbv2 describe-target-groups --load-balancer-arn $ALB_ARN | jq -r '.TargetGroups[0].TargetGroupArn')
aws elbv2 describe-target-health --target-group-arn $TARGET_GROUP_ARN | jq
{
  "TargetHealthDescriptions": [
    {
      "Target": {
        "Id": "192.168.2.153",
        "Port": 8080,
        "AvailabilityZone": "ap-northeast-2b"
      },
      "HealthCheckPort": "8080",
      "TargetHealth": {
        "State": "initial",
        "Reason": "Elb.RegistrationInProgress",
        "Description": "Target registration is in progress"
      }
    },
...

# 웹 접속 주소 확인
kubectl get svc svc-nlb-ip-type -o jsonpath='{.status.loadBalancer.ingress[0].hostname}' | awk '{ print "Pod Web URL = http://"$1 }'

# 파드 로깅 모니터링
kubectl logs -l app=deploy-websrv -f
kubectl stern -l  app=deploy-websrv

# 분산 접속 확인
NLB=$(kubectl get svc svc-nlb-ip-type -o jsonpath='{.status.loadBalancer.ingress[0].hostname}')
curl -s $NLB
for i in {1..100}; do curl -s $NLB | grep Hostname ; done | sort | uniq -c | sort -nr
  52 Hostname: deploy-echo-55456fc798-2w65p
  48 Hostname: deploy-echo-55456fc798-cxl7z

# 지속적인 접속 시도 : 아래 상세 동작 확인 시 유용(패킷 덤프 등)
while true; do curl -s --connect-timeout 1 $NLB | egrep 'Hostname|client_address'; echo "----------" ; date "+%Y-%m-%d %H:%M:%S" ; sleep 1; done
더보기


2개 Pod로 부하 분산
* 인스턴스 모드로 배포하기
apiVersion: v1
kind: Service
metadata:
  name: my-nlb-service
  annotations:
    service.beta.kubernetes.io/aws-load-balancer-type: "nlb"  # NLB 사용
    service.beta.kubernetes.io/aws-load-balancer-scheme: "internet-facing"  # 외부 접근 가능
    service.beta.kubernetes.io/aws-load-balancer-target-type: "instance"  # Instance 모드 사용
spec:
  type: LoadBalancer
  externalTrafficPolicy: Cluster
  selector:
    app: my-nginx
  ports:
    - name: http
      protocol: TCP
      nodePort: 30080  # 노드에서 수신하는 포트 (NLB → 노드)
7. Ingress
- 인그레스 : 클러스터 내부의 서비스를 외부로 노출(HTTP/HTTPS)

7-1) 서비스/파드 배포 테스트 (Ingress)
# 게임 파드와 Service, Ingress 배포
cat <<EOF | kubectl apply -f -
apiVersion: v1
kind: Namespace
metadata:
  name: game-2048
---
apiVersion: apps/v1
kind: Deployment
metadata:
  namespace: game-2048
  name: deployment-2048
spec:
  selector:
    matchLabels:
      app.kubernetes.io/name: app-2048
  replicas: 2
  template:
    metadata:
      labels:
        app.kubernetes.io/name: app-2048
    spec:
      containers:
      - image: public.ecr.aws/l6m2t8p7/docker-2048:latest
        imagePullPolicy: Always
        name: app-2048
        ports:
        - containerPort: 80
---
apiVersion: v1
kind: Service
metadata:
  namespace: game-2048
  name: service-2048
spec:
  ports:
    - port: 80
      targetPort: 80
      protocol: TCP
  type: NodePort
  selector:
    app.kubernetes.io/name: app-2048
---
apiVersion: networking.k8s.io/v1
kind: Ingress
metadata:
  namespace: game-2048
  name: ingress-2048
  annotations:
    alb.ingress.kubernetes.io/scheme: internet-facing
    alb.ingress.kubernetes.io/target-type: ip
spec:
  ingressClassName: alb
  rules:
    - http:
        paths:
        - path: /
          pathType: Prefix
          backend:
            service:
              name: service-2048
              port:
                number: 80
EOF

# 모니터링
watch -d kubectl get pod,ingress,svc,ep,endpointslices -n game-2048

# 생성 확인
kubectl get ingress,svc,ep,pod -n game-2048
kubectl get-all -n game-2048
kubectl get targetgroupbindings -n game-2048

# ALB 생성 확인
aws elbv2 describe-load-balancers --query 'LoadBalancers[?contains(LoadBalancerName, `k8s-game2048`) == `true`]' | jq
ALB_ARN=$(aws elbv2 describe-load-balancers --query 'LoadBalancers[?contains(LoadBalancerName, `k8s-game2048`) == `true`].LoadBalancerArn' | jq -r '.[0]')
aws elbv2 describe-target-groups --load-balancer-arn $ALB_ARN
TARGET_GROUP_ARN=$(aws elbv2 describe-target-groups --load-balancer-arn $ALB_ARN | jq -r '.TargetGroups[0].TargetGroupArn')
aws elbv2 describe-target-health --target-group-arn $TARGET_GROUP_ARN | jq

# Ingress 확인
kubectl describe ingress -n game-2048 ingress-2048
kubectl get ingress -n game-2048 ingress-2048 -o jsonpath="{.status.loadBalancer.ingress[*].hostname}{'\n'}"

# 게임 접속 : ALB 주소로 웹 접속
kubectl get ingress -n game-2048 ingress-2048 -o jsonpath='{.status.loadBalancer.ingress[0].hostname}' | awk '{ print "Game URL = http://"$1 }'

# 파드 IP 확인
kubectl get pod -n game-2048 -owide
8. ExternalDNS
- 서비스/인그레스 생성시 도메인 지정하면 CSP DNS 서비스에 A 레코드로 자동 등록/삭제
. 권한 부여 방식 : NodeGroup IAM Role, Static credential, IRSA

8-1) AWS Route 53 정보 확인 및 변수 지정 (Public 도메인 필요)
# 자신의 도메인 변수 지정 : 소유하고 있는 자신의 도메인을 입력하시면 됩니다
MyDomain=<자신의 도메인>
MyDomain=gasida.link

# 자신의 Route 53 도메인 ID 조회 및 변수 지정
aws route53 list-hosted-zones-by-name --dns-name "${MyDomain}." | jq
aws route53 list-hosted-zones-by-name --dns-name "${MyDomain}." --query "HostedZones[0].Name"
aws route53 list-hosted-zones-by-name --dns-name "${MyDomain}." --query "HostedZones[0].Id" --output text
MyDnzHostedZoneId=`aws route53 list-hosted-zones-by-name --dns-name "${MyDomain}." --query "HostedZones[0].Id" --output text`
echo $MyDnzHostedZoneId

# (옵션) NS 레코드 타입 첫번째 조회
aws route53 list-resource-record-sets --output json --hosted-zone-id "${MyDnzHostedZoneId}" --query "ResourceRecordSets[?Type == 'NS']" | jq -r '.[0].ResourceRecords[].Value'
# (옵션) A 레코드 타입 모두 조회
aws route53 list-resource-record-sets --output json --hosted-zone-id "${MyDnzHostedZoneId}" --query "ResourceRecordSets[?Type == 'A']"

# A 레코드 타입 조회
aws route53 list-resource-record-sets --hosted-zone-id "${MyDnzHostedZoneId}" --query "ResourceRecordSets[?Type == 'A']" | jq
aws route53 list-resource-record-sets --hosted-zone-id "${MyDnzHostedZoneId}" --query "ResourceRecordSets[?Type == 'A'].Name" | jq
aws route53 list-resource-record-sets --hosted-zone-id "${MyDnzHostedZoneId}" --query "ResourceRecordSets[?Type == 'A'].Name" --output text

# A 레코드 값 반복 조회
while true; do aws route53 list-resource-record-sets --hosted-zone-id "${MyDnzHostedZoneId}" --query "ResourceRecordSets[?Type == 'A']" | jq ; date ; echo ; sleep 1; done
8-2) LoadBalancer(NLB) + 도메인 연동(ExternalDNS)
# 터미널1 (모니터링)
watch -d 'kubectl get pod,svc'
kubectl logs deploy/external-dns -n kube-system -f
혹은
kubectl stern -l app.kubernetes.io/name=external-dns -n kube-system

# 테트리스 디플로이먼트 배포
cat <<EOF | kubectl apply -f -
apiVersion: apps/v1
kind: Deployment
metadata:
  name: tetris
  labels:
    app: tetris
spec:
  replicas: 1
  selector:
    matchLabels:
      app: tetris
  template:
    metadata:
      labels:
        app: tetris
    spec:
      containers:
      - name: tetris
        image: bsord/tetris
---
apiVersion: v1
kind: Service
metadata:
  name: tetris
  annotations:
    service.beta.kubernetes.io/aws-load-balancer-nlb-target-type: ip
    service.beta.kubernetes.io/aws-load-balancer-scheme: internet-facing
    service.beta.kubernetes.io/aws-load-balancer-cross-zone-load-balancing-enabled: "true"
    service.beta.kubernetes.io/aws-load-balancer-backend-protocol: "http"
    #service.beta.kubernetes.io/aws-load-balancer-healthcheck-port: "80"
spec:
  selector:
    app: tetris
  ports:
  - port: 80
    protocol: TCP
    targetPort: 80
  type: LoadBalancer
  loadBalancerClass: service.k8s.aws/nlb
EOF

# 배포 확인
kubectl get deploy,svc,ep tetris

# NLB에 ExternanDNS 로 도메인 연결
kubectl annotate service tetris "external-dns.alpha.kubernetes.io/hostname=tetris.$MyDomain"
while true; do aws route53 list-resource-record-sets --hosted-zone-id "${MyDnzHostedZoneId}" --query "ResourceRecordSets[?Type == 'A']" | jq ; date ; echo ; sleep 1; done

# Route53에 A레코드 확인
aws route53 list-resource-record-sets --hosted-zone-id "${MyDnzHostedZoneId}" --query "ResourceRecordSets[?Type == 'A']" | jq

# 확인
dig +short tetris.$MyDomain @8.8.8.8
dig +short tetris.$MyDomain

# 도메인 체크
echo -e "My Domain Checker Site1 = https://www.whatsmydns.net/#A/tetris.$MyDomain"
echo -e "My Domain Checker Site2 = https://dnschecker.org/#A/tetris.$MyDomain"

# 웹 접속 주소 확인 및 접속
echo -e "Tetris Game URL = http://tetris.$MyDomain"
외부에서 도메인으로 접근 가능


기존에 ExternalDNS를 통해 사용한 A/TXT 레코드가 있는 존의 경우에 policy 정책을 upsert-only 로 설정 (기존 레코드가 삭제 될 수 있음)
9. CoreDNS
- k8s에서 클러스터 내부 DNS 서버를 활용하여 Pod와 Service에 대한 DNS 레코드를 자동 생성 관리함
- CoreDNS는 Kubernetes 클러스터에서 DNS 서비스 역할을 하는 경량화된 DNS 서버
. DNS 서비스 제공
. 캐싱, 레코드 조회, 리다이렉션 등의 기능을 쉽게 확장 가능

DNS 흐름
1) Pod 내부 애플리케이션은 resolv.conf를 통해 DNS 조회 수행
2) nodelocaldns가 캐시 역할을 하며, 없으면 CoreDNS로 전달
3) CoreDNS는 Kubernetes API 기반으로 내부 DNS 관리, 필요 시 외부 DNS로 포워딩
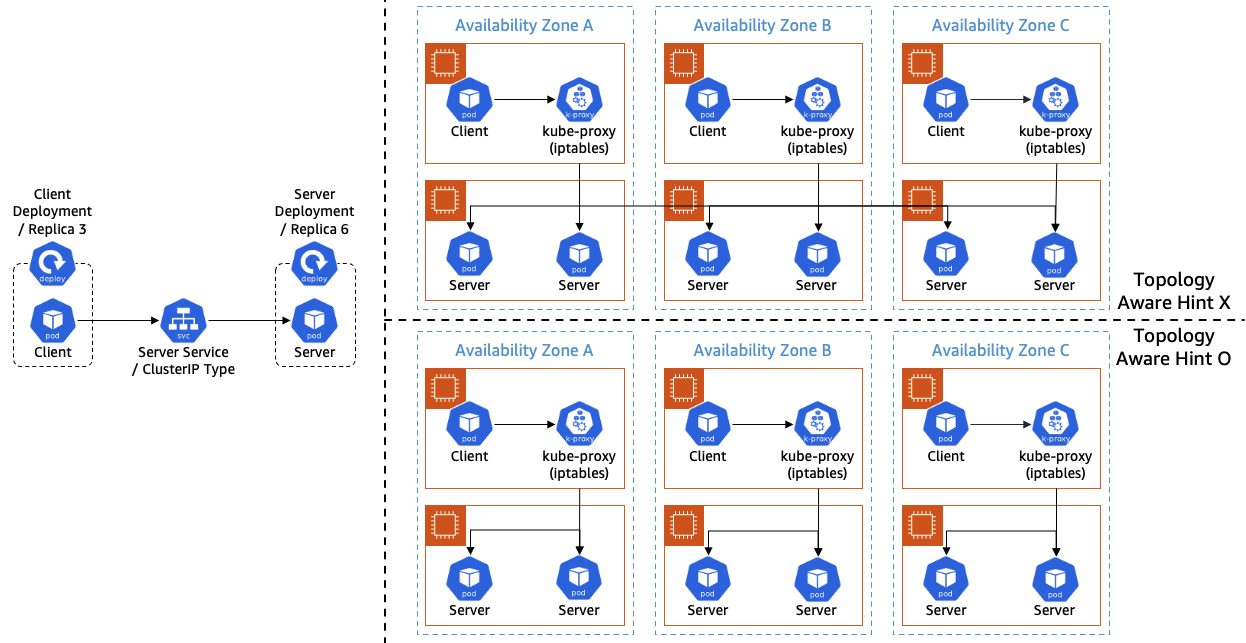
10. Topology Aware Routing
- AZ 간 통신을 줄임으로써 네트워크 비용을 줄일 수 있으며, iptables rule을 통해 구현됨
. app-a -> app-b로 갈 때, app-a가 az-a에 app-b가 az-a, az-b에 기동되어 있으면 az-a에 기동된 app-b로 요청
* 테스트를 위한 어플리케이션 배포
# 현재 노드 AZ 배포 확인
kubectl get node --label-columns=topology.kubernetes.io/zone
NAME                                               STATUS   ROLES    AGE   VERSION                ZONE
ip-192-168-1-225.ap-northeast-2.compute.internal   Ready    <none>   70m   v1.24.11-eks-a59e1f0   ap-northeast-2a
ip-192-168-2-248.ap-northeast-2.compute.internal   Ready    <none>   70m   v1.24.11-eks-a59e1f0   ap-northeast-2b
ip-192-168-3-228.ap-northeast-2.compute.internal   Ready    <none>   70m   v1.24.11-eks-a59e1f0   ap-northeast-2c

# 테스트를 위한 디플로이먼트와 서비스 배포
cat <<EOF | kubectl apply -f -
apiVersion: apps/v1
kind: Deployment
metadata:
  name: deploy-echo
spec:
  replicas: 3
  selector:
    matchLabels:
      app: deploy-websrv
  template:
    metadata:
      labels:
        app: deploy-websrv
    spec:
      terminationGracePeriodSeconds: 0
      containers:
      - name: websrv
        image: registry.k8s.io/echoserver:1.5
        ports:
        - containerPort: 8080
---
apiVersion: v1
kind: Service
metadata:
  name: svc-clusterip
spec:
  ports:
    - name: svc-webport
      port: 80
      targetPort: 8080
  selector:
    app: deploy-websrv
  type: ClusterIP
EOF

# 확인
kubectl get deploy,svc,ep,endpointslices
kubectl get pod -owide
kubectl get svc,ep svc-clusterip
kubectl get endpointslices -l kubernetes.io/service-name=svc-clusterip
kubectl get endpointslices -l kubernetes.io/service-name=svc-clusterip -o yaml

# 접속 테스트를 수행할 클라이언트 파드 배포
cat <<EOF | kubectl apply -f -
apiVersion: v1
kind: Pod
metadata:
  name: netshoot-pod
spec:
  containers:
  - name: netshoot-pod
    image: nicolaka/netshoot
    command: ["tail"]
    args: ["-f", "/dev/null"]
  terminationGracePeriodSeconds: 0
EOF

# 확인
kubectl get pod -owide
10-1) 테스트 파드(netshoot-pod)에서 ClusterIP 접속 시 부하분산 확인 : AZ(zone) 상관없이 랜덤 확률 부하분산 동작
# 디플로이먼트 파드가 배포된 AZ(zone) 확인
kubectl get pod -l app=deploy-websrv -owide

# 테스트 파드(netshoot-pod)에서 ClusterIP 접속 시 부하분산 확인
kubectl exec -it netshoot-pod -- curl svc-clusterip | grep Hostname
Hostname: deploy-echo-7f67d598dc-h9vst

kubectl exec -it netshoot-pod -- curl svc-clusterip | grep Hostname
Hostname: deploy-echo-7f67d598dc-45trg

# 100번 반복 접속 : 3개의 파드로 AZ(zone) 상관없이 랜덤 확률 부하분산 동작
kubectl exec -it netshoot-pod -- zsh -c "for i in {1..100}; do curl -s svc-clusterip | grep Hostname; done | sort | uniq -c | sort -nr"
  35 Hostname: deploy-echo-7f67d598dc-45trg
  33 Hostname: deploy-echo-7f67d598dc-hg995
  32 Hostname: deploy-echo-7f67d598dc-h9vst
10-1) Topology Aware 설정 후 부하 분산
# Topology Aware Routing 설정 : 서비스에 annotate에 아래처럼 추가
kubectl annotate service svc-clusterip "service.kubernetes.io/topology-mode=auto"

# endpointslices 확인 시, 기존에 없던 hints 가 추가되어 있음 >> 참고로 describe로는 hints 정보가 출력되지 않음
kubectl get endpointslices -l kubernetes.io/service-name=svc-clusterip -o yaml
apiVersion: v1
items:
- addressType: IPv4
  apiVersion: discovery.k8s.io/v1
  endpoints:
  - addresses:
    - 192.168.3.13
    conditions:
      ready: true
      serving: true
      terminating: false
    hints:
      forZones:
      - name: ap-northeast-2c
    nodeName: ip-192-168-3-228.ap-northeast-2.compute.internal
    targetRef:
      kind: Pod
      name: deploy-echo-7f67d598dc-hg995
      namespace: default
      uid: c1ce0e9c-14e7-417d-a1b9-2dfd54da8d4a
    zone: ap-northeast-2c
  - addresses:
    - 192.168.2.65
    conditions:
      ready: true
      serving: true
      terminating: false
    hints:
      forZones:
      - name: ap-northeast-2b
    nodeName: ip-192-168-2-248.ap-northeast-2.compute.internal
    targetRef:
      kind: Pod
      name: deploy-echo-7f67d598dc-h9vst
      namespace: default
      uid: 77af6a1b-c600-456c-96f3-e1af621be2af
    zone: ap-northeast-2b
  - addresses:
    - 192.168.1.240
    conditions:
      ready: true
      serving: true
      terminating: false
    hints:
      forZones:
      - name: ap-northeast-2a
    nodeName: ip-192-168-1-225.ap-northeast-2.compute.internal
    targetRef:
      kind: Pod
      name: deploy-echo-7f67d598dc-45trg
      namespace: default
      uid: 53ca3ac7-b9fb-4d98-a3f5-c312e60b1e67
    zone: ap-northeast-2a
  kind: EndpointSlice
...

# 100번 반복 접속 : 테스트 파드(netshoot-pod)와 같은 AZ(zone)의 목적지 파드로만 접속
kubectl exec -it netshoot-pod -- zsh -c "for i in {1..100}; do curl -s svc-clusterip | grep Hostname; done | sort | uniq -c | sort -nr"
  100 Hostname: deploy-echo-7f67d598dc-45trg
* 만약 1개로 pod를 줄이고 동일 AZ에 기동된 Pod가 없다면? 그래도 목적지 Pod로 요청한다.

* topologySpreadContraints로 AZ별로 균등하게 배포할 수도 있다.
# 디플로이먼트 배포
cat <<EOF | kubectl apply -f -
apiVersion: apps/v1
kind: Deployment
metadata:
  name: deploy-echo
spec:
  replicas: 6
  selector:
    matchLabels:
      app: deploy-websrv
  template:
    metadata:
      labels:
        app: deploy-websrv
    spec:
      terminationGracePeriodSeconds: 0
      containers:
      - name: websrv
        image: registry.k8s.io/echoserver:1.5
        ports:
        - containerPort: 8080
      topologySpreadConstraints:
      - maxSkew: 1
        topologyKey: "topology.kubernetes.io/zone"
        whenUnsatisfiable: DoNotSchedule
        labelSelector:
          matchLabels:
            app: deploy-websrv
EOF

# 파드 토폴로지 분배 확인 : AZ별 2개씩 파드 배포 확인
kubectl get pod -owide
NAME                           READY   STATUS    RESTARTS   AGE    IP              NODE                                               NOMINATED NODE   READINESS GATES
deploy-echo-79c4fcbc44-27tr5   1/1     Running   0          108s   192.168.1.240   ip-192-168-1-225.ap-northeast-2.compute.internal   <none>           <none>
deploy-echo-79c4fcbc44-2bgcr   1/1     Running   0          108s   192.168.1.177   ip-192-168-1-225.ap-northeast-2.compute.internal   <none>           <none>
deploy-echo-79c4fcbc44-4gf8n   1/1     Running   0          108s   192.168.3.13    ip-192-168-3-228.ap-northeast-2.compute.internal   <none>           <none>
deploy-echo-79c4fcbc44-5dqt8   1/1     Running   0          108s   192.168.2.65    ip-192-168-2-248.ap-northeast-2.compute.internal   <none>           <none>
deploy-echo-79c4fcbc44-6d99q   1/1     Running   0          108s   192.168.2.180   ip-192-168-2-248.ap-northeast-2.compute.internal   <none>           <none>
deploy-echo-79c4fcbc44-m2qvh   1/1     Running   0          108s   192.168.3.66    ip-192-168-3-228.ap-northeast-2.compute.internal   <none>           <none>
<실습 결과>

11. Amazon EKS now supports Amazon Application Recovery Controller
- AZ 장애시 iptables 규칙 적용을 통해 해당 AZ로 요청을 보내지 않도록함
https://docs.aws.amazon.com/ko_kr/eks/latest/userguide/zone-shift.html

12. Using AWS Load Balancer Controller for blue/green deployment, canary deployment and A/B testing
- AWS LoadBalancer Controller를 이용하여, 다양한 배포 전략을 구현할 수 있음
12-1) 2개 버전의 어플리케이션 배포
#
git clone https://github.com/paulbouwer/hello-kubernetes.git
tree hello-kubernetes/

# Install sample application version 1
helm install --create-namespace --namespace hello-kubernetes v1 \
  ./hello-kubernetes/deploy/helm/hello-kubernetes \
  --set message="You are reaching hello-kubernetes version 1" \
  --set ingress.configured=true \
  --set service.type="ClusterIP"

# Install sample application version 2
helm install --create-namespace --namespace hello-kubernetes v2 \
  ./hello-kubernetes/deploy/helm/hello-kubernetes \
  --set message="You are reaching hello-kubernetes version 2" \
  --set ingress.configured=true \
  --set service.type="ClusterIP"

# 확인
kubectl get-all -n hello-kubernetes
kubectl get pod,svc,ep -n hello-kubernetes
kubectl get pod -n hello-kubernetes --label-columns=app.kubernetes.io/instance,pod-template-hash
12-2) Ingress와 blue/green 확인
#
cat <<EOF | kubectl apply -f -
apiVersion: networking.k8s.io/v1
kind: Ingress
metadata:
  name: "hello-kubernetes"
  namespace: "hello-kubernetes"
  annotations:
    alb.ingress.kubernetes.io/scheme: internet-facing
    alb.ingress.kubernetes.io/target-type: ip
    alb.ingress.kubernetes.io/actions.blue-green: |
      {
        "type":"forward",
        "forwardConfig":{
          "targetGroups":[
            {
              "serviceName":"hello-kubernetes-v1",
              "servicePort":"80",
              "weight":100
            },
            {
              "serviceName":"hello-kubernetes-v2",
              "servicePort":"80",
              "weight":0
            }
          ]
        }
      }
  labels:
    app: hello-kubernetes
spec:
  ingressClassName: alb
  rules:
    - http:
        paths:
          - path: /
            pathType: Prefix
            backend:
              service:
                name: blue-green
                port:
                  name: use-annotation
EOF

# 확인
kubectl get ingress -n hello-kubernetes
kubectl describe ingress -n hello-kubernetes
...
Rules:
  Host        Path  Backends
  ----        ----  --------
  *
              /     blue-green:use-annotation (<error: endpoints "blue-green" not found>)
Annotations:  alb.ingress.kubernetes.io/actions.blue-green:
                {
                  "type":"forward",
                  "forwardConfig":{
                    "targetGroups":[
                      {
                        "serviceName":"hello-kubernetes-v1",
                        "servicePort":"80",
                        "weight":100
                      },
                      {
                        "serviceName":"hello-kubernetes-v2",
                        "servicePort":"80",
                        "weight":0
...

# 반복 접속 확인
ELB_URL=$(kubectl get ingress -n hello-kubernetes -o=jsonpath='{.items[0].status.loadBalancer.ingress[0].hostname}')
while true; do curl -s $ELB_URL | grep version; sleep 1; done
  You are reaching hello-kubernetes version 1
  You are reaching hello-kubernetes version 1
  ...
12-3) Blue/Green 전환

#
cat <<EOF | kubectl apply -f -
apiVersion: networking.k8s.io/v1
kind: Ingress
metadata:
  name: "hello-kubernetes"
  namespace: "hello-kubernetes"
  annotations:
    alb.ingress.kubernetes.io/scheme: internet-facing
    alb.ingress.kubernetes.io/target-type: ip
    alb.ingress.kubernetes.io/actions.blue-green: |
      {
        "type":"forward",
        "forwardConfig":{
          "targetGroups":[
            {
              "serviceName":"hello-kubernetes-v1",
              "servicePort":"80",
              "weight":0
            },
            {
              "serviceName":"hello-kubernetes-v2",
              "servicePort":"80",
              "weight":100
            }
          ]
        }
      }
  labels:
    app: hello-kubernetes
spec:
  ingressClassName: alb
  rules:
    - http:
        paths:
          - path: /
            pathType: Prefix
            backend:
              service:
                name: blue-green
                port:
                  name: use-annotation
EOF

# 확인
kubectl describe ingress -n hello-kubernetes

# 반복 접속 확인 : 적용에 약간의 시간 소요
ELB_URL=$(kubectl get ingress -n hello-kubernetes -o=jsonpath='{.items[0].status.loadBalancer.ingress[0].hostname}')
while true; do curl -s $ELB_URL | grep version; sleep 1; done
  You are reaching hello-kubernetes version 2
  You are reaching hello-kubernetes version 2
  ...
12-4) Ingress와 Canary 배포

#
cat <<EOF | kubectl apply -f -
apiVersion: networking.k8s.io/v1
kind: Ingress
metadata:
  name: "hello-kubernetes"
  namespace: "hello-kubernetes"
  annotations:
    alb.ingress.kubernetes.io/scheme: internet-facing
    alb.ingress.kubernetes.io/target-type: ip
    alb.ingress.kubernetes.io/actions.blue-green: |
      {
        "type":"forward",
        "forwardConfig":{
          "targetGroups":[
            {
              "serviceName":"hello-kubernetes-v1",
              "servicePort":"80",
              "weight":90
            },
            {
              "serviceName":"hello-kubernetes-v2",
              "servicePort":"80",
              "weight":10
            }
          ]
        }
      }
  labels:
    app: hello-kubernetes
spec:
  ingressClassName: alb
  rules:
    - http:
        paths:
          - path: /
            pathType: Prefix
            backend:
              service:
                name: blue-green
                port:
                  name: use-annotation
EOF

# 확인
kubectl describe ingress -n hello-kubernetes

# 반복 접속 확인 : 적용에 약간의 시간 소요
ELB_URL=$(kubectl get ingress -n hello-kubernetes -o=jsonpath='{.items[0].status.loadBalancer.ingress[0].hostname}')
while true; do curl -s $ELB_URL | grep version; sleep 1; done

# 100번 접속
for i in {1..100};  do curl -s $ELB_URL | grep version ; done | sort | uniq -c | sort -nr
12-5) Ingress와 A/B 테스트

#
cat <<EOF | kubectl apply -f -
apiVersion: networking.k8s.io/v1
kind: Ingress
metadata:
  name: "hello-kubernetes"
  namespace: "hello-kubernetes"
  annotations:
    alb.ingress.kubernetes.io/scheme: internet-facing
    alb.ingress.kubernetes.io/target-type: ip
    alb.ingress.kubernetes.io/conditions.ab-testing: >
      [{"field":"http-header","httpHeaderConfig":{"httpHeaderName": "HeaderName", "values":["aews-study"]}}]
    alb.ingress.kubernetes.io/actions.ab-testing: >
      {"type":"forward","forwardConfig":{"targetGroups":[{"serviceName":"hello-kubernetes-v2","servicePort":80}]}}
  labels:
    app: hello-kubernetes
spec:
  ingressClassName: alb
  rules:
    - http:
        paths:
          - path: /
            pathType: Prefix
            backend:
              service:
                name: ab-testing
                port:
                  name: use-annotation
          - path: /
            pathType: Prefix
            backend:
              service:
                name: hello-kubernetes-v1
                port:
                  name: http
EOF

# 확인
kubectl describe ingress -n hello-kubernetes

# 반복 접속 확인 : 적용에 약간의 시간 소요
ELB_URL=$(kubectl get ingress -n hello-kubernetes -o=jsonpath='{.items[0].status.loadBalancer.ingress[0].hostname}')
while true; do curl -s $ELB_URL | grep version; sleep 1; done
...

while true; do curl -s -H "HeaderName: aews-study" $ELB_URL | grep version; sleep 1; done
...

# 100번 접속
for i in {1..100};  do curl -s $ELB_URL | grep version ; done | sort | uniq -c | sort -nr
for i in {1..100};  do curl -s -H "HeaderName: aews-study" $ELB_URL | grep version ; done | sort | uniq -c | sort -nr
13. 네트워크 분석 도구
네트워크 분석 도구로 kubeskoop 등 다양한 도구를 사용할 수도 있다. (latency, 패킷 캡처 등..)
<kubeskoop 설치 실습>
더보기
#
kubectl apply -f https://raw.githubusercontent.com/alibaba/kubeskoop/main/deploy/skoopbundle.yaml
kubectl patch service webconsole -n kubeskoop -p '{"spec": {"type": "LoadBalancer"}}'
kubectl patch service prometheus-service -n kubeskoop -p '{"spec": {"type": "LoadBalancer"}}'
kubectl patch service grafana -n kubeskoop -p '{"spec": {"type": "LoadBalancer"}}'
# cpu 부족하니, 미사용 파드/디플로이먼트는 삭제(kube-ops-view, netshootpod 등) 혹은 워커노드를 증설
kubectl get-all -n kubeskoop
kubectl get pod -n kubeskoop
#
kubectl get svc -n kubeskoop webconsole
# kubeskoop 웹 접속 : admin / kubeskoop
kubectl get svc -n kubeskoop webconsole -o jsonpath='{.status.loadBalancer.ingress[0].hostname}' | awk '{ print "KubeSkoop URL = http://"$1""}'
# 프로메테우스 웹 접속
kubectl get svc -n kubeskoop prometheus-service -o jsonpath='{.status.loadBalancer.ingress[0].hostname}' | awk '{ print "prometheus URL = http://"$1""}'
# 그라파나 웹 접속 : admin / kubeskoop
kubectl get svc -n kubeskoop grafana -o jsonpath='{.status.loadBalancer.ingress[0].hostname}' | awk '{ print "grafana URL = http://"$1""}'
#


14. AWS EKS IPVS mode

- IPVS 프록시 모드 : L4 로드 밸런싱을 담당하는 커널 기반의 IPVS를 사용할 수 있음
. Iiptables보다 낮은 지연 시간과 높은 성능을 제공 : 커널 스페이스에서 동작하고, 해시 테이블을 사용해 트래픽 처리
ㅋ# 이미 설치되어 있음
sudo dnf install -y ipvsadm ipset -y

# Next, you need to load the kernel modules for the IPVS configuration options listed above. We recommend writing these modules to a file inside of the /etc/modules-load.d/ directory so that they survive a reboot.
sudo sh -c 'cat << EOF > /etc/modules-load.d/ipvs.conf
ip_vs
ip_vs_rr
ip_vs_wrr
ip_vs_lc
ip_vs_wlc
ip_vs_lblc
ip_vs_lblcr
ip_vs_sh
ip_vs_dh
ip_vs_sed
ip_vs_nq
nf_conntrack
EOF'

# You can run the following command to load these modules on a machine that is already running.
sudo modprobe ip_vs
sudo modprobe ip_vs_rr
sudo modprobe ip_vs_wrr
sudo modprobe ip_vs_lc
sudo modprobe ip_vs_wlc
sudo modprobe ip_vs_lblc
sudo modprobe ip_vs_lblcr
sudo modprobe ip_vs_sh
sudo modprobe ip_vs_dh
sudo modprobe ip_vs_sed
sudo modprobe ip_vs_nq
sudo modprobe nf_conntrack

#
sudo lsmod | grep ^ip_vs
ip_vs_nq               16384  0
ip_vs_sed              16384  0
ip_vs_dh               16384  0
ip_vs_sh               16384  0
ip_vs_lblcr            16384  0
ip_vs_lblc             16384  0
ip_vs_wlc              16384  0
ip_vs_lc               16384  0
ip_vs_wrr              16384  0
ip_vs_rr               16384  0
ip_vs                 192512  20 ip_vs_wlc,ip_vs_rr,ip_vs_dh,ip_vs_lblcr,ip_vs_sh,ip_vs_nq,ip_vs_lblc,ip_vs_wrr,ip_vs_lc,ip_vs_sed

# 모니터링
watch -d kubectl get pod -n kube-system

# Next, you will configure your cluster’s kube-proxy DaemonSet to run in IPVS mode. This is done by setting the kube-proxy mode to ipvs and the ipvs scheduler to one of the load balancing options listed above, for example: rr for Round Robin.
# You can issue an AWS CLI command to enable IPVS by updating the kube-proxy EKS Add-on.
aws eks update-addon --cluster-name $CLUSTER_NAME --addon-name kube-proxy \
  --configuration-values '{"ipvs": {"scheduler": "rr"}, "mode": "ipvs"}' \
  --resolve-conflicts OVERWRITE
혹은 configmap 수정
kubectl -n kube-system edit cm kube-proxy-config

# If your worker nodes were joined to your cluster prior to making these changes, you will need to restart the kube-proxy DaemonSet.
kubectl -n kube-system rollout restart ds kube-proxy
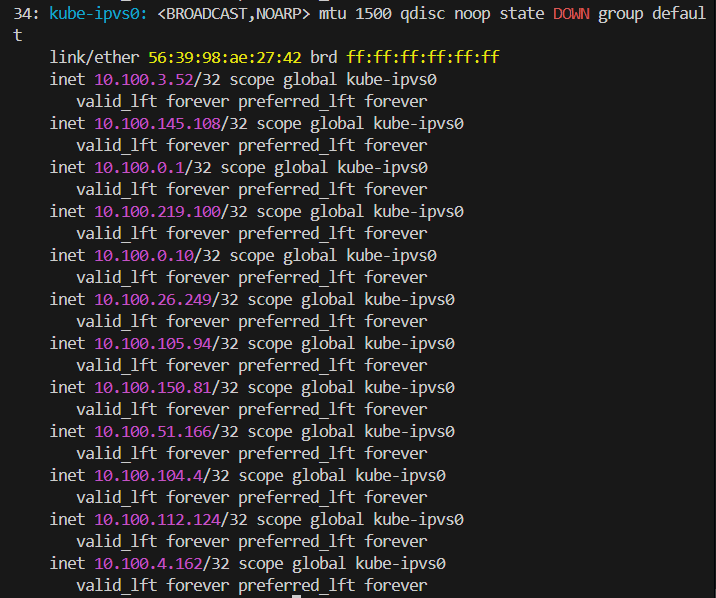


'K8S - EKS' 카테고리의 다른 글
| 7주차 - EKS Mode/Nodes (0) | 2025.03.22 |
|---|---|
| 6주차 - EKS Security (0) | 2025.03.15 |
| 5주차 - EKS Autoscaling (0) | 2025.03.07 |
| 4주차 - EKS Observability (0) | 2025.02.28 |
| 3주차 - EKS Storage, Managed Node Groups (1) | 2025.02.22 |


